The Gallipoli campaign of 1915-1916 is one of many infamous failures of the First World War. An attempt by the Allies to seize ground in Turkey, it turned from an ineffective naval expedition to a stalled and bloody ground fight.
But there was one significant success for the Allies in amongst all this disaster. The end of the campaign and the conduct of the withdrawal from the Gallipoli Peninsula showed wise decision-making and smart execution that were absent throughout the rest of the expedition.
The Decision to Withdraw
By October 1915, Allied troops had been on the beaches of the Gallipoli Peninsula for six months. Instead of gaining control of the end of the peninsula in three to four days, as their commanders had planned, they had spent half a year occupying trenches on a shallow beachhead in two areas of the coast – Cape Helles and ANZAC beach, given that name for the Australian and New Zealand troops there.
On the 15th of October, Lieutenant-General Sir Charles Monro took over command of operations at Gallipoli. After carrying out an inspection of the situation, he contacted the British high command recommending that the expedition be abandoned and the troops withdrawn.
Field Marshal Lord Kitchener, the Minister of War, was appalled at this suggestion. Huge effort had gone into taking territory at Gallipoli, with thousands of men lost. Such sacrifice should not be for nothing.
In November, Kitchener visited Gallipoli in person. He saw freezing soldiers living in flooded trenches, under constant pressure from the Turks. No advances were being made, despite the provision of reinforcements. Soldiers were barely clinging on, forced to survive on the steep and merciless hillsides of that coast.
The experience changed Kitchener’s mind. It was time to give up on Gallipoli.
Preparing the Way

Near the end of November, the weather took an even more bitter turn toward the cold. Frost-bite affected the men. Between sickness and injury, many were sent back from the lines for treatment.
For those still on the front, a new pattern appeared. Sick comrades never returned, however minor their ailments. Something was amiss.
Behind this was Lieutenant-General Sir William Birdwood. He was the man who had originally told Kitchener that the naval campaign at Gallipoli would need army support. His report had brought these men to this awful place. Now he had been put in charge of getting them out.
The challenge for Birdwood was arranging an evacuation in good order. Once the Turks realized that soldiers were leaving, they could make the most of Allied weakness to over-run those who remained. The evacuation had to be swift, orderly, and as covert as possible.
Evacuating ANZAC

The evacuation began with the ANZAC beachhead. On the 13th of December, under cover of darkness, troops were marched down to the piers, loaded onto boats, and taken out to transport ships. By the 18th of December, half of the 80,000 ANZAC troops had been removed without the Turks realizing. By five in the morning on the 21st of December, the whole ANZAC front was empty.
Tricking the Turks

The retreating soldiers went to great lengths to trick the Turks into thinking that they were still in place. Rifles were rigged with devices including burning candles and drip-filled water cans, carefully arranged so that they would keep firing at the enemy trenches long after the soldiers were gone.
If the Turks caught on, then the retreat could turn into a route. Secrecy continued as the remaining Allied sector around Cape Helles began evacuating in the New Year.
The Turks Attack

The charade could not be maintained forever. By the 7th of January, the game was up. Field Marshal Liman von Sanders, the German officer commanding the Turkish troops, realized that his opportunity had arrived. It was time to attack.
19,000 British troops remained when the Turkish artillery opened fire. It was the heaviest bombardment the Gallipoli front had seen, designed to shatter the British lines, smash their trenches, and leave them open for attack.
As dusk approached, Turkish infantry streamed out of their trenches and charged the remnants of the British force.
They ran into a withering hail of fire from rifles and machine guns. The British might have fewer men than they once had, but their trenches had protected most of them from the bombardment. The first wave of attackers was mown down. The second wave refused to leave their trenches and risk meeting the same fate.
Von Sanders’ attack had failed. The British had bought themselves more time.
The Final Withdrawal

In the quiet of the next two days, the last of the Allied forces departed the Gallipoli Peninsula. Again, the evacuation had to be completed without giving the Turks the chance to attack the last survivors. They might not have been willing to charge fully defended trenches, but a crowd of men waiting for a boat? That was a different matter.
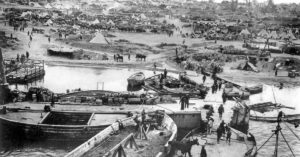
The last British troops left Gallipoli under cover of darkness at 0445 on the 9th of January. As they left, an explosion was triggered which destroyed the remaining ammunition and stores. The Allies would not be leaving supplies for their enemies.
Over 35,000 men were evacuated from Cape Helles. 3,600 horses and mules, 300 vehicles, and 125 heavy guns went with them. A shambolic campaign had a smoothly executed ending.
What Was Recovered and What Was Lost?

Around 115,000 soldiers were evacuated from the Gallipoli Peninsula in less than a month. Birdwood’s careful planning ensured that the heavy losses expected in this withdrawal never came. Tens of thousands of lives were saved.
But it was a small part of a much heavier toll. 252,000 Allied troops were lost at Gallipoli. Getting so many out alive let the Allies end the affair with some dignity, but it could not undo what had come before.
Source:
Martin Marix Evans (2002), Over the Top: Great Battles of the First World War.