The standard British tank of the inter-war years, the Vickers Medium Mark 2 was based on a design from not long after World War I. Its box-like hull was topped with a turret that carried a 3-pounder gun and coaxial Vickers machine gun.
Two other Vickers machine guns could be thrust through firing ports in the sides of the hull.
By 1939, this tank was out of date but still in use. It was mostly used for training, though a few were used against the Italians in the Middle East.
Side view of a Vickers Mark 2 Medium tank on manoeuvres. This tank weighs fifteen tons and is armed with a 47mm main gun and three .303 machine guns.
Vickers Medium Mark II at the Bovington Tank Museum.Photo: DAVID HOLT CC BY-SA 2.0
Vickers Medium Mk II tank of the Royal Tank Regiment at Farnborough, 1940.
Vickers Medium Mk II tank of the Royal Tank Regiment on manoeuvres at Bovington Camp, Dorset, November 1939.
Vickers Medium Mk II tank
Vickers Medium Mk II* tank of the Royal Tank Regiment at Farnborough, 1940.
Vickers Light Tank Mark 6
The last in a series of light tanks developed by Vickers in the 1930s, the Vickers Mark 6 had relatively thin armor and was armed only with machine guns.
Many of them were used in the Battle of France in 1940, where the world learned that light tanks were too weak and vulnerable in modern warfare. It was a lesson that came at a great cost for the crews of the Mark 6.
A Mk VI undergoing maintenance, France 1940. The location of the engine, beside the driver, can be seen
Light Tank Mk VIB
Light Tank Mk.VI chassis with a German 10.5 cm leFH 16 howitzer mounted
Light Tank Mk.VIA of the 3rd King’s Own Hussars.
Vickers Light Tank Mk VIC knocked out during an engagement on 27 May 1940 in the Somme sector.
Vickers light tanks cross the desert, 1940
Matilda
Many British military thinkers expected a similar sort of combat to WWI, so they developed a slow, heavily-armored tank–the Matilda–designed to escort infantry as they advanced over open, broken ground.
Already in use at the start of the war, Mark 1 and 2 Matildas fought in the Battle of France, where their heavy armor provided effective protection against German guns. Equipped only with machine guns, the Mark 1s was phased out during the war.
The Mark 2 was the only British tank to serve throughout the conflict, seeing action in Europe, Africa, and East Asia.
A Matilda advancing through Egypt as part of Operation Compass.
A Matilda Frog being demonstrated on Morotai, June 1945
An Australian, howitzer-equipped Matilda of the 2 9th Armoured Regiment in combat at the Battle of Tarakan (May 1945)
Matilda Baron under test
Matilda I tanks in the Bovington Tank Museum.Photo Jonathan Cardy CC BY-SA 3.0
Matilda II.A Matilda’s crew display a captured Italian flag as they enter Tobruk, January 1941
Matilda Scorpion in North Africa, 1942
Tank, Infantry, Mk I, Matilda I (A11)
The driver of a Matilda I in France during the winter of 1939–40. This shows the cramped driver’s compartment and how the hatch obstructs the gun turret.
Valentine
Designed by Vickers-Armstrong as an alternative to the Matilda, the Valentine was rushed into production as war approached. Despite being cramped, difficult to drive, and having visibility problems, it was popular with its crews thanks to its reliability and robustness.
A series of weapons upgrades kept it relevant through much of the war, but by 1944 it had become obsolete.
A Valentine in North Africa, carrying infantry from a Scottish regiment.
A Valentine tank which was captured by the Germans in 1942 and used by them until it was knocked out, February 1943
Crew inside a Valentine tank loading the 2-pounder gun
Flame mortar fitted to Valentine tank chassis, firing phosphorus bombs
Infantry tank Valentine II in Kubinka tank museum, Russia.Photo: Saiga20K CC BY-SA 3.0
The first tank to be manufactured in Canada, a Valentine VI, being inspected by C D Howe the Canadian Minister of Munitions and Supply in May 1941
The Valentine IX. This was armed with the QF 6-Pounder gun with many of these being sent to Russia under Lend Lease
Valentines bound for the Soviet Union being loaded on C.P.R. flat cars
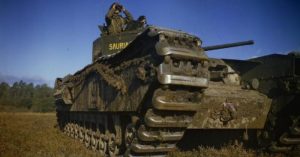
Churchill
Another infantry tank, the Churchill became a British mainstay. With its hull-high tracks and deep-set front, it was initially built to carry only a 2-pounder gun in its turret and a 3-pounder howitzer in the front of the hull. This weaponry was steadily upgraded until some carried 95mm howitzers.
First used in the disastrous Dieppe Raid of 1942, the Churchill served successfully in other theatres, including on the Eastern Front, and provided the basis for many specialist armored vehicles.
A Churchill bridgelayer of 51st Royal Tank Regiment in action during a demonstration in the Mezzano area, 30 March 1945.
A Churchill tank of the North Irish Horse crossing the Senio in Italy on two stacked Churchill ARKs, April 1945
A postwar Churchill Kangaroo viewed from the left rear
A Soviet Churchill Mk IV passes a knocked-out German Sd.Kfz 232 (8-Rad) armoured car at the fourth battle of Kharkov in 1943
AVRE 290mm Petard Mortar and its ammunition (projectile standing on its flat nose, with tail facing up, at right)
Churchill Ark Mk II (UK Pattern)
Churchill ARV Mk II with front jib erected
Churchill AVRE with fascine on tilt-forward cradle. This particular example is a post-WW2 AVRE on the MK VII chassis.
Churchill Crocodile
Churchill Gun Carrier in Dorset, 25 March 1943
Churchill Mark I with hull-mounted 3-inch howitzer in exercises on Salisbury Plain, January 1942
Churchill Mark III tanks of ‘Kingforce’ during the 2nd Battle of El Alamein
Churchill Mark III
Churchill Mark VI
Churchill Mark VII
Churchill Mark VIII with 95mm howitzer
Churchill tanks of 9th Royal Tank Regiment during an exercise at Tilshead on Salisbury Plain, 31 January 1942
North Irish Horse Churchill advancing towards Florence, Italy. 23 July 1944.
Tank, Infantry, Mk IV (A22)
Cruiser Mark 4
Between the world wars, military thinkers developed the idea of the cruiser tank: a relatively fast-moving machine that would sweep around enemy flanks and into the rear. By 1939, this led to the Cruiser Mark 4.
The Mark 4 fought in France and the Western Desert. But the idea of flanking cruisers did not match the reality of war, and its 2-pounder gun was underpowered for modern tank fighting.
A Cruiser Mk IV tank destroyed in the North African Campaign.
An A13 Cruiser Mk IV and a Matilda tank at a depot in Egypt, 5 September 1941.
Cruiser Mk IV tank knocked out during an engagement on 30 May 1940
Cruiser Mk IV tanks
Cruiser Mk IV tanks of 5th Royal Tank Regiment, 3rd Armoured Brigade, 1st Armoured Division, drive through a Surrey village, July 1940.
Cruiser Mk IV tanks of 5th Royal Tank Regiment, 3rd Armoured Brigade, 1st Armoured Division.
Cruiser Mk IVA tanks on exercise, 1st Armoured Division, 20 April 1941.
Cruiser-MkIV
Tank, Cruiser, Mk IV (A13 Mk II)
Crusader
The last inter-war cruiser design, the Crusader retained the 2-pounder gun and so proved to be under-powered in combat. A version with a 6-pounder gun was developed in May 1942 and acted as the main weapon of British armored formations. They were replaced later in 1942 when the Americans supplied the British with Grant and Sherman tanks.
Cleaning the barrel of the 6-pdr in Tunisia
Crusader AA tank variant mounting a triple Oerlikon gun in a hull-down position, 19 July 1944
Crusader AA with 40 mm Bofors gun, at the Armoured Fighting Vehicle School, Gunnery Wing at Lulworth in Dorset, 25 March 1943
Crusader I tanks in Western Desert, 26 November 1941, with “old” gun mantlets and auxiliary Besa MG turret.
Crusader I with its auxiliary turret in place
Crusader II, and Covenanter at rear, training in Yorkshire, 1942
Crusader III before Alamein, with ‘Sunshade’ camouflage
Crusader Mk III tanks in Tunisia, 31 December 1942.
Crusader Mk III
Cavalier
Designed and put into production with ill-judged haste in 1941, the Cavalier was a cruiser tank with a 6-pounder gun, designed to provide something with more firepower and durability.
500 Cavaliers were ordered before the prototype was even tested. Many of its components were taken from the Crusader, so it inherited that tank’s mechanical problems. Due to their unreliability, they never saw battle as tanks, though some were converted to into recovery and command vehicles.
Covenanter
Another rush job, the Covenanter had good deflective armor but its tracks were too narrow and its engine cooling defective. Over a thousand were made, but it was never used in battle.
A pilot model. The radiator covers are at the left front. Note also the Valentine-type gun mantlet. Most production Covenanters had a different type of mantlet
Covenanter bridgelayer with vehicle-launched span
Covenanters of the 2nd (Armoured) Irish Guards, Guards Armoured Division, during an inspection (3 March 1942)
Tank, Cruiser, Mk V, Covenanter (A13 Mk III)
Centaur
Built in response to the same specification as the Cavalier but with less haste, the Centaur was more successful. A rectangular tank in the style of other British cruisers, it was equipped with a 6-pounder and later a 75mm gun. Its greatest successes came with the Mark 4, which carried a 95mm howitzer.
Marines fired these guns from landing craft in support of the D-Day landings, then brought them ashore to guard the beaches. They were successful as they carried on inland, serving as effective battle tanks.
Cromwell
The Cromwell was Great Britain’s last cruiser tank, built to make use of the newly developed Merlin Meteor engine. It initially carried a 6-pounder gun but was later upgraded to heavier weaponry.
A Cromwell IV of the Welsh Guards displays its speed at Pickering in Yorkshire, 31 March 1944
Sent into combat on the continent in 1944-5, it was under-gunned compared with German machines, but its agility and speed proved valuable, especially once the enemy were in retreat in the final months of the war.
A King’s Royal Hussars Cromwell of the 11th armoured division advances through Uedem, Germany, 28 February 1945
Centaur Dozer with hydraulic operated blade
Centaur IV of Royal Marine Armoured Support Group, Normandy 13 June 1944
Cromwell VI with type F hull, showing driver’s side-opening hatch and turret storage bins
Cromwell VIIw with type Dw or Ew hull, showing welded construction with applique armour
Czechoslovak soldiers on a Cromwell tank near Dunkirk in 1945.
Wounded German soldiers being ferried to an aid post on the hull of a Cromwell tank
Challenger
By 1942, one of the main problems with British tanks was their inadequate firepower. To counter this, the Birmingham Carriage & Wagon Company created the Challenger, which had a modified Cromwell chassis with a 17-pounder gun.
The turret had to be higher to house the weapon and the chassis was lengthened to accommodate this, with the extra weight impeding performance. As a result, the Challenger was vulnerable in battle, so it was generally used in support of other cruisers, using its heavy weapon as a tank killer.
A Challenger tank crosses a Bailey bridge near Esch, Netherlands. 27 October 1944
Cruiser tank Challenger (A30)
Tank, Cruiser, Challenger (A30)
Comet
To counter the problems faced by the Challenger, another tank was developed, again fitting a new gun on top of a Cromwell chassis. This became the Comet, which carried a 77mm gun – effectively a lighter version of the 17-pounder. It didn’t enter combat until the final months of the war, but proved popular with crews, as it was reliable and agile.
A Comet’s crew loading 77 mm HV ammunition into their tank.
Comet tanks of the 2nd Fife and Forfar Yeomanry, 11th Armoured Division, crossing the Weser at Petershagen, Germany, 7 April 1945
Firefly
An American Sherman tank upgraded with a British 17-pounder gun, the Firefly was developed to help Allied tankers take on German Tigers and Panthers.
Used by both British and American forces in the invasion of Europe, it was so effective that it became a prime target for the Germans, so camouflage paint was used to disguise its long barrel.
A Sherman Firefly crosses ‘Euston Bridge’ over the Orne as it moves up to the start line for Operation Goodwood, 18 July 1944
A Sherman Firefly of 7th Armoured Division in Hamburg, 4 May 1945
Firefly of 5th Canadian Armoured Division assists troops of 49th (West Riding) Division to clear the Germans from Ede, Netherlands, 17 April 1945
Firefly tanks of the South African Pretoria Regiment, Italy 1944
Loading 17-pounder rounds into a Firefly
Sherman Fireflies with “60 lb” air-to-ground rockets on rails attached to the turret
Sherman Firefly during the Battle of the Bulge, 1944
Tetrarch
Light enough to be transported by air, the Tetrarch was carried into action by a Hamilcar glider. It was used in the invasion of Madagascar in 1942 and Normandy in 1944, giving airborne troops valuable armored support.
General Sir Alan Brooke, Commander-in-Chief Home Forces, inspecting a Light Tank Mk VII (Tetrarch) at the Army Staff College, 1941