It was on the morning of the second day of Operation Market Garden, and the British Soldiers commanded by John Frost who defended the north end of the road bridge could hear the sounds of tanks. Very few reinforcements had reached them overnight, and they had only around 750 men at the bridge, so relief was very welcome.
Could it be that the tanks of the British XXX-Corps had reached Arnhem that quickly? Was victory just around the corner?

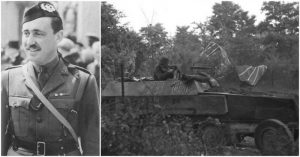
Eagerly they awaited the first sight of the Sherman tanks when the first vehicle finally came across the bridge. But it wasn’t a Sherman tank; it wasn’t even an allied tank. It was an armored car of the SS Recon Battalion that drove towards them at full speed. Before they could open fire, it had reached the safety of the German lines, quickly followed by three more vehicles.
Then the British opened up with everything they had.
Getting to the objective
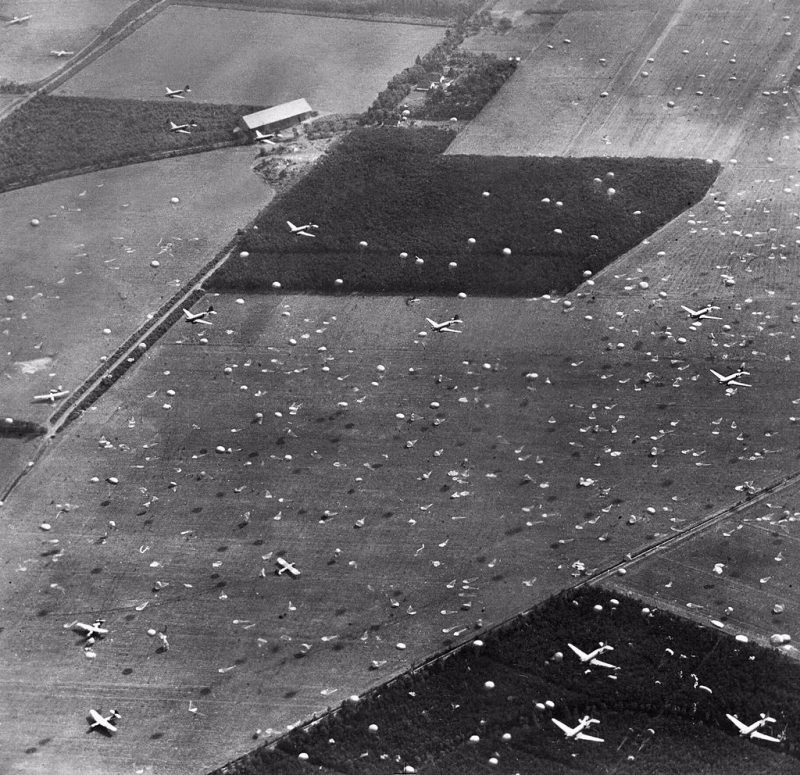
The 2nd Parachute Brigade of the British 1st Airborne Division landed around 14:45 on the open grounds near Heelsum. To speed up the assembly of the battalion Lt Col. John Frost brought with him a hunting horn and which he used repeatedly. All the men had to do was head towards the sound, which helped to lessen the confusion on the drop zone.

It took until 15:30 before the battalion was able to move off the drop zone and start their 8-mile march on their assigned route towards the bridge. The order of march was A Company with Lt Jack Grayburn up front followed by the rest of the battalion. Tagging along was the 1st Parachute Brigade HQ and 16 Field Ambulance who would peel off later.

After an eventful journey during which the railway bridge was destroyed almost from under them, but that is the subject of another story, they arrived at the Arnhem bridge.
The enemy
Only minutes before the 2nd Batallion arrived at the bridge, the last vehicles of the 9th SS Recon Battalion, officially called by the Germans the “SS Panzer Aufklärungs Abteilung” left it and headed for Nijmegen but, inexplicably, left nobody to guard the bridge.
Earlier that day, those same vehicles had been loaded on trains to be transported to Germany, with the rest of the 9th SS Panzer Division “Hohenstaufen.” There they would get some much needed rest before taking in replacements, both men, and vehicles.
A significant portion of the division had already left, but the experienced Germans had moved the administrative troops first and kept their fighting men near Arnhem as long as possible.
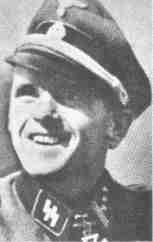
Among those still near Arnhem was the Recon Battalion, commanded by SS-Hauptsturmführer Viktor Gräbner. Just a few hours earlier on that same day the 9th SS division commander, Obersturmbannführer Walter Harzer pinned on his chest the Knights Cross in a ceremony that was cut short by the arrival of allied fighter-bombers.

It was at that time that the 9th and the 10th SS division, also in the area, went on the alert. Less than 90 minutes later they witnessed the pathfinder parachutists of Boy Wilsons 21st Independent Parachute Company land, and by then they knew what to do.
Unloading of the vehicles already on flat cars at the railhead began immediately, and trains that had already moved out were recalled or stopped and unloaded on the spot. Vehicles they kept in “broken down” condition in workshops in order not to lose them to the 10th SS, were put back together in a hurry.

Within three hours of landing, the Germans were able to send the SS Recon Battalion with 40 vehicles on a scouting mission. They were to drive to the bridge at Arnhem and then Nijmegen and report back on any enemy troops they encountered.
When Gräbner arrived that the bridge in Arnhem he reported back to his HQ by radio “no enemy in sight.” The British Jeeps that should have secured the bridge hours earlier had run into an ambush, and John Frost and his men had not yet arrived. Then Gräbner made an inexplicable error. With all his men and vehicles, he crossed the bridge to the south and left it virtually unguarded.
Arriving at the bridge
It was getting close to 7 pm when the first British paratroopers entered streets at the north end of the bridge. They immediately took possession of the houses all around their objective. The first task was to prepare them for defense.

They smashed in the glass in windows to prevent the glass from exploding inward, pushing the furniture to the frames for more cover. Then they started filling all available sinks, baths, toilets, and buckets with water as they had learned in training.
At the same time, A company launched the first attack to capture the south end of the bridge. Lieutenant Grayburn led his men onto the ramp and stealthily they moved towards the span of the bridge when suddenly a German machine gun opened up.

Finding no cover and taking heavy casualties they were forced to pull back. Another attempt to take out the machine guns with a flamethrower failed and caused the ammo shed to explode, setting the fresh paint on the bridge alight and making further attacks suicide.
During the night, the Germans launched some strong counterattacks, but they were repulsed at the loss of the easternmost houses of the bridge perimeter.
Crossing the Rhine
After leaving the Bridge area, Gräbner drove to Elst and again reported that no enemy was in sight. He then drove on to the bridge at Nijmegen only to inform HQ of the same thing. He also noticed that there was a sizable force at the bridge already and, having completed his mission, he turned around and headed back to the village of Elst where he spent his last night on earth.
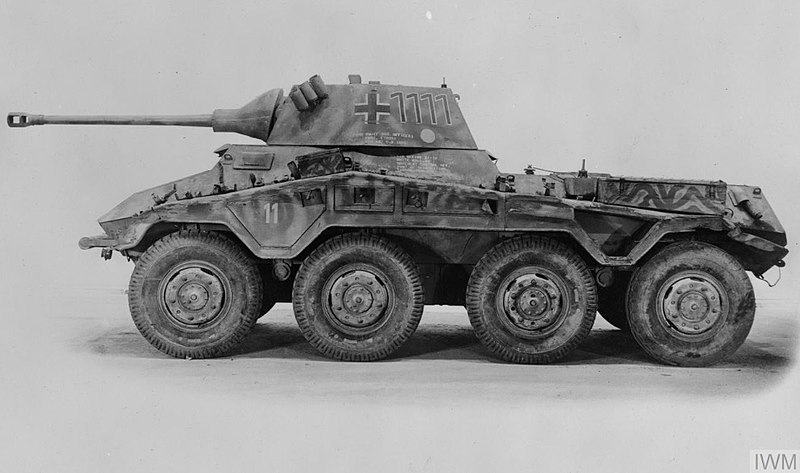
On the morning of September 18th, he moved his 22 vehicles and around 500 men further south to the bridge at Arnhem. There he organized them into attack formation with at least five sd. kfz. 234 “Puma” armored cars up front, followed by open-topped half-tracks and finally his unarmored soft skin vehicles all filled with his grenadiers. He himself would be in his captured British Humber scout car. At 09:00, he launched his attack.

It is now assumed that he wanted to join the rest of his division on the north bank of the Rhine river and crossing the bridge was the quickest way to do that. Some historians say he ordered the attack himself, others claim that he had received orders to do so.

He must have known of the British presence on the north ramp, and it seems he underestimated their number and firepower. Gräbner was also known to make quick decisions and having a powerful column of armored vehicles may have convinced him of guaranteed success.
Attack

After revving the engines on the south bank to make sure they would not stall, the order to attack was given. One by one they started moving, up the ramp, over the center of the bridge and then down through the British perimeter and then safety.
The Puma’s made it across without difficulty, they had the speed and the element of surprise on their side and reached the safety of the German lines in seconds. Now the British were ready, and the heavy open-topped half-tracks came under withering fire.

Hand grenades were thrown into the troop compartments causing instant carnage. Then the mortars opened up, followed by PIAT (Projectile Infantry Anti Tank) bombs and the deadly 6-pounder anti-tank guns.
One by one the half-tracks were destroyed, the crews trying the find cover on a bridge that offered none. Fuel tanks exploded, and burning fuel was soon engulfing disabled vehicles and wounded Germans. More and more vehicles tried to push their way through the burning wreckage, but in the withering British fire, they did not stand a chance.

Suddenly the 75mm Pack Howitzers located at Oosterbeek opened up and added to the carnage. A radio link allowed the forward observer at the bridge to accurately aim the incoming shells.
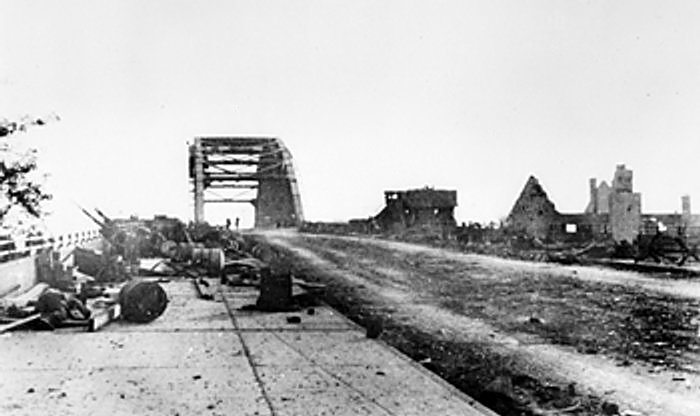
Two half tracks crashed through the bridge barrier and tumbled several feet down to the street below. SS-soldiers were seen diving into the water of the Rhine river to escape the deadly fire. All the while the Paratroopers kept up a steady stream of fire until suddenly there were no more targets to fire on. The bridge ramp now was a smoking heap of burning vehicles, bodies and equipment, thoroughly blocked to all traffic.

As for the fate of Victor Gräbner, there is only uncertainty. He was leading from the front of the column during the attack, but he went missing during the battle. The Germans were not able to retrieve his body after the British were defeated a couple of days later. He remains missing to this day.
For the British Paratroopers, this battle was a massive morale boost. They had stopped a massive German attack destroying at least 12 vehicles and soon the 2nd Battalion battle cry of “Whoa Mahomet” was heard all over around their perimeter. However, during the 2,5-hour battle, they had expended vast quantities of ammunition that they were unable to replenish.

Under Siege
Soon after the fighting on the bridge ramp ended, the Germans launched new attacks from the north and east trying to dislodge the stubborn paratroopers who denied them the use of this vital crossing. Then they changed tactics and stopped launching costly infantry attacks.

One by one they started to demolish the houses the British were clinging on to. Window by window, room by room they fired high explosives and incendiary shells until there were no more buildings to occupy.
With a herculean effort, the paratroopers were able to deny the use of the bridge to the Germans for another 36 hours before they were pushed away from the ramp. The last pockets of resistance held out even longer until they were all taken prisoner in the morning of the 21st of September.

The stubborn defense at the bridge had been costly for the British, 81 out of 750 men were killed, virtually all other men were wounded. However, we do not know the German casualty figures in the attacks to retake the bridge.
Joris Nieuwint is a battlefield tour guide for Operation Market Garden. As “The Battlefield Explorer” he creates videos which cover battlefields, museums, and commemorations. For more information, videos and how to hire him as a guide, visit his website: https://thebattlefieldexplorer.com.