The Battle of Stirling Bridge took place on September 11, 1297, during the Wars of Scottish Independence which were fought in the last years of the 13th century and through most of the 14th century.
King Edward I, also known as “Edward Longshanks” and the “Hammer of the Scots,” reigned over the realms of England and Scotland. However, the Scottish army of William Wallace and Andrew Moray fought the English army to regain control of the north.
King Edward’s rule over Scotland was never accepted by its citizens. He only became a self-proclaimed suzerain after the surrender of the Scottish king, John Balliol, in 1296. Edward always had his sights on extending his monarchy and a dilemma relating to the rightful succession to the Scottish throne gave him an ideal opportunity.

In 1287, Alexander III, the king of the Scots, died without an heir. The subsequently chaotic period became known as The Great Cause. With so many aspirants to the throne and several ill-fated events surrounding the succession, the Scottish nobility felt they needed some expertise on the matter.
They called on Edward’s intervention to oversee the process. This was a huge mistake on their part for it afforded the ambitious English king some recognition in the affairs of Scotland, one which he eventually capitalized on.
Balliol emerged as King of Scotland in 1292, but his reign was not for very long. Fully aware of Edward’s schemes, Balliol signed the Auld Alliance, a pact with the French who were, at the time, enemies of the English. Edward rightly interpreted this as an act of war. Impatient and ill-tempered as he was, he wasted no time in launching his first attack on Berwick-upon-Tweed and captured it.

With his more than efficient militia, Scotland soon fell into Edward’s hands. Balliol was held prisoner in the Tower of London. John de Warenne, the sixth Earl of Surrey and King Edward’s trusted commander, was placed as regent over Scotland on August 22, 1296. However, a few months into his appointment, Warenne moved back to his hometown, citing the excuse of unfavorable weather conditions.
It is interesting to wonder if the climate in Scotland was the only thing that sent him packing. His presence in the region was a constant reminder of the English intrusion and oppression of Scotland. The slaughter of thousands of men, women, and children at Berwick had bred contempt for the English in the hearts of all Scots. There were rumors of rebel groups that sought revenge. This was not an ideal place for any Englishman.

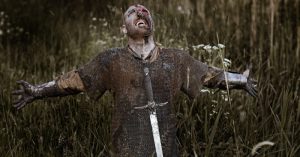
No sooner had Warenne abandoned his duty than the rebel groups began leading uprisings. With little English authority left in Scotland, the situation deteriorated swiftly. Out of the ensuing chaos emerged a rebel leader who would later become one of Scotland’s greatest national heroes: William Wallace.
Wallace looked upon English rule with utter disdain. He vowed that, with a good enough army, he would attempt to free Scotland from King Edward’s reign of tyranny.

One account tells how his first violent encounter with the English involved a squire who forcefully tried to seize Wallace’s knife. Instead, Wallace slit the squire’s throat then fled. His actions made him a wanted man in the region and as revenge for the death of their young squire, the English at Dundee planned to massacre the Scots there. This deed, combined with the murders of his father and brother, spurred Wallace into even more rebellious acts of vengeance.
Wallace led an attack against the English at Lanark in May 1297 where he killed and dismembered the body of the man in charge, Sheriff William Heselrig. His actions there earned him some recognition among other rebel groups fighting in Southern Scotland. He was later joined by Robert Bruce, a noble who had been pitched against Balliol during the Great Cause of 1292. Bruce’s affiliation drew other nobles to Wallace and his army grew rapidly.

While Wallace led Scottish uprisings in the south, Andrew de Moray took charge of the north. However, both forces came together after the nobility in Southern Scotland were subdued by Percy in the Capitulation of Irvine on July 9, 1297. After the nobility surrendered at Irvine, the rebellion army’s numbers were greatly reduced so that a merger with Moray was necessary if they hoped to withstand the English forces.
Towards the start of September, news reached Moray and Wallace of a great English army marching north under the command of Warenne. On the morning of September 11, the combined Scottish forces huddled up near the mile-long, wooden Stirling Bridge which overlooked the Forth River to await their enemy. However, after assessing the English troops, they realized that their numbers were too small to go up against Warenne directly.

The strength of the English force is estimated to have been between 10-13,000 troops, including some highly experienced commanders, with a heavy cavalry of about 1,000 men. On the other hand, Wallace and Moray’s forces were pitched at about 7,000 men, with the more experienced troops coming from Moray’s faction. They were going to have to fight with tact and strategy rather than strength if they were to secure victory for Scotland.
Wallace and Moray had chosen their location north of the Forth River as it prevented the whole English army from crossing at the same time. Wallace baited the English, trying to draw them onto the bridge, which was the safest way across but was so narrow that the English would have to advance slowly, only two or three horses at a time.

With Warenne was Hugh de Cressingham and Sir Richard Lundie, who had been the first Scottish noble to join the English at the Capitulation of Irvine. Lundie knew the risks involved in advancing across the bridge and, although he tried to counsel Warenne against it, also knew that the earl would hardly trust the word of a Scot.
Instead, Warenne chose to take Cressingham’s advice. Cressingham led the English vanguard across the bridge while Wallace watched and waited until a significant number of the English troops were over the bridge before signaling for the Scottish army to begin their assault at 11:00 AM.

The eager Scottish troops charged from their positions on the slopes of the Abbey Craig. Both the blast of the horn that signaled the charge as well as the loud outcry that followed threw the English troops into a state of confusion.
The English infantry that had been sent ahead of the heavy cavalry was repelled and, as they retreated, they ran into their advancing comrades. The battle was a complete disaster for Warenne who fled the scene after realizing his error in judgment. Fearing for his life, Warenne made no attempt to slow down or stop until he reached friendlier territory in Berwick.

Meanwhile, his troops on the battlefield were killed without mercy by the Scots. Notably, Cressingham was thrown down from his horse and slain during the fighting. Horses collided with each other as the English troops retreating ran into the oblivious troops who were still advancing.
Chaos on the bridge resulted in some of the troops falling into the Forth River. English survivors were few as most of them were either killed in battle or drowned after the bridge collapsed under the weight of the pandemonium.

Despite the advanced weaponry, training, and numbers that the English troops possessed, they were brutally defeated by the Scots. Moray would share in the glory of the victory for only a little while since the wounds he sustained led to his death a short time later.
About 5,000 English casualties were recorded during the battle. Little is known about the damage to the Scottish troops. Their victory, however, was a decisive one and very significant for the Scots because the Battle of Stirling Bridge was meant to be the resistance’s last stand against English tyranny. Had they been defeated, Scotland may never have known Independence again.
Read another story from us: King Edward I and The English Conquest Of Wales
Wallace’s achievement on this battlefield was simply genius and worthy of praise. After the battle, he assumed the role of Guardian of the Kingdom of Scotland in the name of John Balliol. Even to this day, he is regarded as one of the country’s greatest heroes.