In 1942, the army of the Free French lost the Battle of Bir Hakeim against Rommel in the North African desert.
However, in war, sometimes a victory is not a victory, and sometimes a defeat is not a defeat. In 280/279 BC Greek general Pyrrhus twice defeated the Roman army. In both cases, the victories cost him so much and the Romans so little comparatively, that Pyrrhus was forced to retreat.
In 1836, the Texans were defeated at the Alamo in their uprising against the Mexican government. Though utterly defeated, the defeat rallied the remaining Texans and their allies in the United States and eventually led to the final defeat of the Mexicans a month and a half later.

The battle between the Free French forces under Brigadier General Marie Pierre Koenig and the Axis forces under General (later Field Marshal) Erwin Rommel in the German attempt to drive deep into Egypt and seize the Suez Canal was a military defeat – the French were forced to retire, and the Germans and their Italian allies drove over three hundred miles further into Allied territory, BUT…

The greatly outnumbered French forces held up the Axis forces for so long that they virtually destroyed any chance of the Germans taking Malta (a key Allied supply port and air base in the Mediterranean, half-way between mainland Europe and Africa), and allowed the British and Imperial forces fighting alongside the French to make an orderly withdrawal into Egypt, where they set up strong defensive positions at/near El Alamein, which eventually led to the critical Allied victory in the fall of 1942.

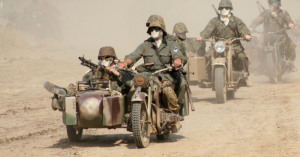
In late May 1942, Rommel and his British counterpart, General Claude Auchinleck, were both preparing for an offensive on what was known as the “Gazala Line” just south of the important port of Tobruk, in Libya. Facing off against each other were some 90,000 Axis troops (50,000 German, 40,000 Italian), supported by 560 tanks (332 German) and 542 German and Italian aircraft), against 110,000 Allied troops from the nations of the British Empire, equipped with 843 tanks and 604 aircraft.
Among those 110,000 Allied troops were just under 4,000 Free French troops, including the 2nd Colonial Demi-Brigade (a “demi-brigade” is a uniquely French term signifying a unit of approximately 2,000 men), made up primarily of West African colonial troops, along with French Marines, an anti-tank company, and the army “Battalion of the Pacific”.
Also present was a unit of one of the most famous units in military history, the 13th Demi-Brigade of the “Legion Étrangèr” – the Foreign Legion.

These were accompanied by artillery, mortar, anti-tank, heavy machine gun and anti-aircraft units.
The Foreign Legion contingent was commanded by Colonel Dimitri Amilakvari, a Georgian aristocrat whose family had fled Georgia when it was taken over by the Soviet Union in 1921. His family eventually ended up in France, where he attended the military academy at St. Cyr in 1926.
Upon graduation, he was posted to the Foreign Legion and later took part in actions against various colonial uprisings in North Africa. He also took part in the in the Allied campaign in Norway and the battle for France in 1940. In 1941, he fought against Vichy French forces in Africa and Lebanon.

Amilakvari and the other officers of the Foreign Legion commanded men from all over the world. It is well-known that until the last two or three decades, the Foreign Legion was partially made up of men trying to hide from their pasts and start a new life under a new name and flag.
Some were criminals, some adventurers, some wanted out from a bad marriage at a time when divorce was frowned upon in many countries. Others were refugees wishing to fight their oppressors – many of the men in the Legion in 1940 were Poles and Czechs whose nations had been conquered by Hitler.

The African part of the French force was made up of a number of black Africans from today’s Central African Republic (where a number of Foreign Legion units are now stationed in an attempt to prevent ethnic bloodshed) Senegal and Madagascar. Many of these men had already seen action, against both the Vichy French and their German and Italian allies.
The French Marines had always had a reputation for toughness, but like many of their countrymen, were humiliated, both at home and abroad, by the conquest of France by Germany in 1940. For many of these men, the goal of their fight was not just to free France, but to restore both the honor of their (sometimes adopted) homeland and their own.

Bir Hakeim was an old abandoned Ottoman imperial fortress located at the southern end of the so-called “Gazala Line” in the Sahara Desert of Libya. Running from the Mediterranean coast at Gazala west of Tobruk to Bir Hakeim about 60 miles to the southeast, the Gazala Line was a formidable obstacle. Among the many defenses were hundreds of thousands of mines, if not more. At Bir Hakeim alone, the Allies planted 50,000 mines.
Despite their disadvantage in numbers, the Axis forces had one thing that the Allies did not – Rommel. The German general had already begun building his reputation as the “Desert Fox”, who used maneuver and ruse to confuse and outflank his enemy time and again.
The mines were meant to defend those areas that the Allies could not man – no one can be everywhere, and it was almost assured that Rommel would show up where he was least expected.

On May 27th, he showed up at the far southern end of the Allied line, at Bir Hakeim. His forces consisted of the 15th and 21st Panzer Divisions, the part of the 90th Light Division and the Italian Ariete Division. Other elements of the Axis forces attacked all along the Gazala Line.
Initially, over-running elements of the Imperial 3rd Indian Brigade, Rommel’s forces stormed through the desert towards Bir Hakeim, hoping to overrun the Allied forces at the southern end of their line and catch the main body of Allied troops from the rear.
Failing that, it was hoped that a successful flanking movement around Bir Hakeim would force the Allies to quickly fall back towards Egypt, allowing Hitler the opportunity to divert some of his North African forces to conquer the island of Malta, which was a thorn in the side of his supply routes from Europe.

Within hours of routing the Indian brigade, the Axis forces, led in this case by the Italian armored division, stormed the Allied line around Bir Hakeim. They charged across a mine and barbed wire barrier at the French. 31 tanks and a self-propelled gun were destroyed in the mines, but ten Italian tanks surged through the obstacles, only to be gunned down by accurate French anti-tank fire. They then withdrew to lick their wounds.
Over the next two days, British air support was sent to help the defenders, but between dust storms and the wrecked Italian tanks, had difficulty finding targets. To both make it easier for the British planes and to throw the enemy off balance, French troops raided the Axis positions in front of Bir Hakeim.
Eventually, Italian artillery fire drove them back, but seven Axis vehicles had been destroyed. Despite being out-numbered almost 10-1, the French showed they were willing to take the fight to the enemy.

One of the outstanding features of the French position at Bir Hakeim was the amazing defensive belt they had thrown around the old fortress area. There were over one thousand entrenched positions – foxholes, emplacements and deep large bunkers for vehicles and ammunition. A unit of some seventy British-made Bren gun carriers formed both a mobile reserve and relayed supplies.
However, as you can imagine, water was at a premium, and as the battle raged on, the supply dwindled. This was only made worse when the Germans released hundreds of Allied prisoners into the care of the men at Bir Hakeim – not an accident. Though British supply trucks did occasionally reach the men, supplies were always tenuous.

Despite the water shortage, the insane desert heat during the day and cold at night, the French held out. Between the 31st of May and June 2, the Germans and Italians launched attack after attack. Most of them were beaten back, but the weight of numbers began to slowly show, and the circle of defenses around Bir Hakeim got progressively smaller.
While the men were fighting on the ground, Allied and Axis fighters and bombers fought in the sky, trading losses. On the morning of June 1, the Italian officers under a white flag asked for the surrender of Bir Hakeim, which General Koenig politely refused.
Over the course of the next nine days, the Germans launched hundreds of air attacks on the French positions. Most of these were ineffectual, as the defenses had been so well prepared. However, repeated German and Italian attacks began to slowly weaken the strength of the French force. Worse, ammunition was running low.
It was decided on the 10th of June, after extremely tough fighting (much of it hand to hand) that the out-numbered and out-gunned garrison would have to undertake a fighting withdrawal.

On the night/morning of June 10/11, the French sent sappers to clear a way through their own minefields through which the main force could retire. Driving General Koenig’s car was an incredible person, Miss Susan Travers, who had served with the French Red Cross during the defeat of France, into Norway and then joined de Gaulle’s Free French.
During the drive out of Bir Hakeim, her car was hit by no less than eleven bullets – but all within survived. At wars’ end, she was formally enrolled in the Foreign Legion, went on to serve in Vietnam, and finally retired to France with her husband, another Legionnaire.
A number of leading French officers were killed in the retreat. The 13th Demi-Brigade of the Legion under Amilakvari covered the retreat. Out of the original 3,600 man force, some 2,700 men (and one woman) escaped, including 200 walking wounded. Sadly, Amilakvari was killed at El Alamein a few months later.

As a result of the stand at Bir Hakeim: the Axis had to venture further south into the desert to try to outflank Allied lines – stretching supply routes and times, which helped to allow the Allies to retreat in an orderly fashion. The French fight also destroyed Hitler’s timetable for taking Malta – which was never seriously looked at again.
But, perhaps most important of all the Battle of Bir Hakeim showed the world that the French, under the proper leadership, could fight, and fight well – they had held their own for over two weeks against a numerically superior and skilled foe.
Hitler called the Free French the “best fighters – after the Germans”. Churchill began to call them “The Fighting French”, and noted German general von Mellenthin after the war noted that in the whole desert war “…we never encountered a more heroic and well-sustained defense.”