On 11 September 1297, an outnumbered Scottish army defeated the English at the Battle of Stirling Bridge. The most spectacular victory of William Wallace, the Scottish leader depicted in Braveheart (1995), it proved to the embattled Scots that they could drive back the invaders from the south. Though there were setbacks ahead, Stirling Bridge was a key moment in ensuring Scottish independence.
In the face of overwhelming odds, how did William Wallace win at Stirling Bridge?
1. Inspiring Leadership
The Anglo-Scottish war was not a straightforward conflict between two nations. There were several competitors for the Scottish throne, and many Scottish nobles switched sides during the course of the war. But Wallace was a diehard supporter of John Balliol, the Scottish king. Wallace’s steadfast character helped him to inspire other Scots, gathering an army several thousand strong despite his relatively minor position in the Scottish nobility. Leading by example, he launched a campaign of guerrilla warfare against the invaders from 1296 to 1297, binding his men to him.
2. Andrew Moray
Wallace was not the only Scottish commander at Stirling Bridge. Earlier in the year, he had combined forces with Andrew Moray, another leader of the northern Scottish rebels. Moray was a fellow Balliol loyalist, and had escaped from English captivity following the Battle of Dunbar in 1296. Though Wallace had more men serving under him, Moray was a more senior noble, and his presence brought the army credibility and political support. Fatally wounded during the Battle of Stirling Bridge, Moray is not as well remembered as Wallace, but he contributed as much to the Scottish victory.

3. Manoeuvrability
Wallace and Moray’s army had one big strategic advantage – it was more manoeuvrable. Fighting on their home ground, and without the extensive supply train the invading army needed, they campaigned on their own terms, forcing the English to face them in a place of their choosing. Their experience as hit and run guerrilla fighters equipped them perfectly for such a campaign.
4. Negotiations at Irvine
Wallace and Moray were not the only Scottish nobles rebelling against the English in 1297. In fact, they were among the least powerful of the Scots’ leaders. Another revolt further south fizzled out, its leaders negotiating a peace rather than fight the English. But while they failed to support Wallace and Moray’s revolt, they drew out negotiations long enough to buy the northern rebels more time.
5. A Calculated Gamble

With their larger population, larger treasury and more experienced troops, the English were always likely to win in a pitched battle. Up until Stirling Bridge, Wallace and Moray avoided this, relying upon small raids by mobile forces. Their troops were kept scattered across the countryside, so that the English could not corner them. Their hope was to damage English morale and supplies, forcing a a withdrawal. But by September 1297 a large English army was marching north to crush the Scottish government. Wallace and Moray gambled on their ability to win if they could just find a battle site that was to their advantage.
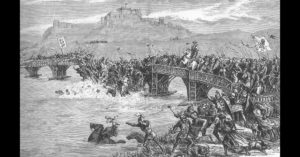
6. The Forth Crossing
The site Wallace and Moray chose was a crossing of the River Forth at Stirling. Though there were other places upstream where men and horses could cross, Stirling Bridge was the only place for many miles where the English could bring their supply wagons across the river. Facing the English at Stirling created a win win situation for the Scots. Either the English would be forced to fight at the crossing, Wallace and Moray’s preferred battle site, or they would have to withdraw, leaving northern Scotland safe.
7. The English Commanders

In the battles before and after Stirling Bridge, the English were led by King Edward I, known as the Hammer of the Scots. An experienced, skilful and determined general, Edward was a terrifying force to face in battle. But in 1297, believing that the Scots were effectively beaten, he crossed the sea to Flanders to fight another war. In his place, the army invading Scotland was led by the arrogant Earl of Surrey and the unpopular English Treasurer of Scotland Hugh Cressingham. Not only were both men less capable commanders than Edward, but their lack of coordination and proper leadership left the English army confused and indecisive. As a result, the English vanguard crossed the Forth and then withdrew twice before the battle, leaving them increasingly tired and disorganised in the lead up to their third and final crossing.
8. English Morale
Poor leadership was not the only factor damaging English morale. Many in the army were providing customary military service as part of their rent, and had no great desire to fight. Others were suspected criminals from less law abiding border regions, men out for themselves. In overseas campaigns it was hard to desert, but from Scotland a deserter could just walk south until he came home. The further they got from England, and the more supplies dwindled, the more men deserted and the further morale fell.
9. Using the Land
The northern end of the bridge at Stirling lay on the buckle of the Forth, a small patch of land surrounded on three sides by the river. On the day of the battle, Wallace and Moray mustered their men on high ground facing the buckle. Waiting until a large part of the English army had crossed, they then rushed down and seized the neck of the buckle, the narrow gap the English would need to pass through to reach open ground. Surrounded by the river, the English were unable to bring their superior numbers to bear. Instead, the tight press of men acted against them, making it hard to organise themselves, to fight, and ultimately to flee.
10. Accidentally Ahead of Their Time
Made up mostly of relatively poor soldiers, the Scottish army had few of the heavily armoured men-at-arms and shock cavalry that were the elite of contemporary armies. Instead their army was made up mostly of spear-wielding infantry. Though no-one knew it at the time, their victory was in fact a sign of things to come. Over the following century, infantry formations of polearms and bowmen would increasingly dominate the battlefields of Europe, bristling hedges of spears breaking enemy charges. The English themselves would win famous victories using longbowmen in a similar role. The accident of poverty turned Wallace’s troops into an army ahead of their time.