The details behind every Victoria Cross are fascinating, but James Allen Ward may have the most unique tale of all.
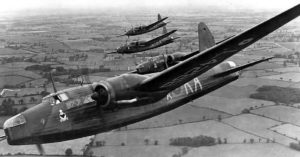
The 22-year-old New Zealand-born pilot actually climbed out onto the wing of his plane while it was at 13,000 feet to put out a fire that was threatening to down the Wellington (AA-R) of which he was co-pilot.
Despite the heroic nature of the youngster’s actions, he nearly failed to win the VC because he took those risks with some interest of self-preservation. But in the end, the stunning, brave, and daredevil nature of the events that took place on 7 July 1941 were simply too noteworthy to ignore.
Ward was born in Wanganui, a city on the west coast of New Zealand’s North Island. He initially trained as a teacher in 1938 at the Wellington College of Education. Ward enlisted two years later into the Royal New Zealand Air Force (RNZAF) where he underwent training.
Then, in January 1941, Ward set sail on the Aorangi and was stationed at Lossiemouth air base in Scotland.
The pilot had been stationed in Britain for around half a year when the day dawned in which he would enter into the history books.

He was on a raid on Munster as the second pilot in a Wellington (AA-R). According to reports from Ward himself, there was little in the way of air defense above the targets: a few searchlights and light flak was all the Germans had mustered for the defense.
It was all going smoothly. The crew dropped their bombs, made a circuit of the town and began the journey back to base. And then all of a sudden things changed.
Over the Dutch Bay of Zuider Zee, it all took a turn for the worse. A mechanical error only exacerbated the problem. Ward spotted an enemy plane coming in from the port side of the Wellington, but because he was in the Astrodome, he had to use the intercom to tell the pilot about the danger.
The only problem was, the intercom had failed. This failure left the crew and the plane powerless to stop the incoming attack.
Moments after Ward realized this, the German aircraft opened fire.
Because of the attack, the Wellington’s pilot went into a nose dive to try and escape the danger – but the attacking plane had already been shot down by the rear gunner, who couldn’t communicate this with the rest of the crew due to the failure of the intercom.

During the skirmish, the engine on the starboard side of the Wellington had taken a hit, and the hydraulics had been damaged beyond use. Half of the undercarriage fell – which made it useless for landing on.
To make matters even worse, the bomb doors also fell open, and the front gunner suffered a wound to his foot. On top of all that, the intercom set still was not working.
The situation didn’t need complicating, but this was war, and war is rarely simple. And so it was that the petrol feed pipe split open and a fire began on the top of the starboard wing.
It was at this point that Ward and his fellow crewmates thought they would have to bail out of the stricken aircraft – and so they put on their parachutes in preparation for the moment when they would jump out of the Wellington.
In true ‘never give up’ style, the men created a hole in the side of the fuselage so they could try and put out the fire on the wing with an extinguisher, but it was too far away from them to allow that. And so with a stiff upper lip they even threw coffee at it, but the fire continued unchecked.
At this point, the plane reached the Dutch coast, and the crew took the decision to take their chances over the North Sea rather than risk downing the aircraft over German territory and spending time in a prisoner of war camp.
The squadron leader was ready to let nature run its course, but Ward wasn’t. And so he climbed out of the Astrodome and onto the wing – attached to safety with the rope that was intended to be used to stop the rubber dinghy from drifting away from the plane when it was on water.
With his navigator holding onto the rope so Ward wouldn’t plunge into the abyss, he kicked footholds into the wing as he went down it to enable more purchase.
Despite incredible pressure from the airstream, which nearly blew him off the wing, Ward managed to smother the fire in the wing fabric and then tried to push an engine cover through the hole and onto the leaking fuel pipe. But once he took his hand away the wind whipped it through the air and into oblivion.

With help from his navigator, Ward made it safely back into the plane. The last paragraph of his VC citation read: “There was now no danger of the fire spreading from the petrol pipe as there was no fabric left near it and in due course, it burned itself out.
“When the aircraft was nearly home, some petrol which had collected in the wing blazed up furiously but then died down quite suddenly. They achieved a safe landing despite the damage sustained to the aircraft.
“The flight home had been made possible by the gallantry of Sergeant Ward in extinguishing the fire on the wing in circumstances of the greatest difficulty and at the risk of his life.”
Sadly, Ward was killed on the 15th of September 1941 when his bomber crashed over Hamburg. Two of the five survived. It was only his 11th mission and his fifth as crew captain.