The battles for Ypres were among the defining engagements of the Western Front during the First World War. Ypres became a harbinger of much that was to come in the next four years.
Why Fight at Ypres?
Generals in the First World War expected their armies to be mobile. In the autumn of 1914, both sides were engaged in a series of flanking maneuvers and were trying to get around each other for a decisive victory.
The result was the Race to the Sea, in which they both pushed further and further toward the coast. As they went, they dug in, laying the ground for static trench warfare.
The town of Ypres was on the line of the advance.
The Ground
The Belgian town of Ypres had once been an important medieval trading center. However, it was not the town itself that made it the center of action – it was the surrounding terrain.

On three sides of Ypres were rows of ridges. Although not big by the standards of the rest of the world, compared with the surrounding Belgian lowlands there were high. This made them strategically significant.
Seizing the Ground

The first forces to arrive at Ypres were a German cavalry patrol on October 13, 1914. The next day, the British 7th Division and 3rd Cavalry Division arrived. They took the ridge east of Ypres, which featured the Menin Road. The 2nd Cavalry Division moved onto the Messines Ridge to the south.
The British intention was to keep advancing and liberate Belgian from the Germans. For short term protection, they started digging in.
The Menin Offensive
Over the next few days, both sides poured troops into the area. Not realizing the Germans outnumbered them, the British planned on using their fresh troops to advance southeast and take Menin.
This advance began on October 19. Unfortunately for the British, the Germans knew the attack was coming, as they had captured a British officer carrying his orders. The 7th Division advanced into an overwhelming enemy force and had to retreat.
Aerial reconnaissance told the British they now faced a massive German force.
Germans Attack the Salient
At Ypres, a salient had developed– a bulge from the Allied lines into what would otherwise have been German territory. On October 21, the Germans began their attempt to take this ground.
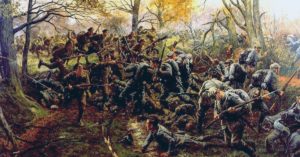
Among the thousands of soldiers flung into this attack were the Reserve Corps. Made up of poorly trained reserves, many of them older men, they attacked with little skill or knowledge of what they were doing. Their losses of 1,500 dead and 600 captured led the German press to label this incident the Kindermord zu Ypern – the Massacre of the Innocents at Ypres.
Polygon Wood

Over the next few days, the fighting spread up and down the line. Day and night, men fought in the cold and damp. The Germans penetrated the Allied line in several places.
One of the most fiercely contested was Polygon Wood, north of the Menin Road. Here the Royal Warwickshire Regiment, reinforced by the Northumberland Hussars, struggled to hold back the advance.
The 2nd Battalion Worcestershire Regiment, who were meant to be resting after the previous week’s fighting, were hurried to the wood. Seeing that rifle fire among the trees would hit as many friends as foes, they repulsed the Germans with a bayonet charge. Emerging from the far side of the wood, they came under fire and dug in.
Clinging On
Both sides made repeated attempts to break each other’s lines, with the Germans almost succeeding. The British and French clung on stubbornly in the face of ferocious attacks and faulty equipment; their guns jamming due to poorly made cartridges.
Once again, the 2nd Worcesters came to the rescue. When the Germans almost broke through along the Menin Road on October 31, the Worcesters were pulled out of Polygon Wood to fill the gap. An officer named Lieutenant Slaughter harried the German retreat with a machine gun.
Messines Ridge
At the same time, fierce fighting was taking place at Messines Ridge. Here, British Territorial Army troops – reservists rather than professional soldiers – saw their first action. They clung on through a bloody moonlit night of jammed weapons and fighting shadows in a landscape of cratered ground and splintered trees.
The British were forced off the ridge, but the French 32nd Division stepped in to stop the German advance. Within days the Allies held the high ground once again.
November 11

A period of relative quiet followed. Both sides were reeling from the shock of their failures and the casualties they had taken.
On November 10, the Germans seized the town of Dixmude.
The following day saw the last attempt at a breakthrough. An early morning artillery bombardment by the Germans preceded a massive assault down the Menin Road.
Exhausted French Zouaves broke under the attack, giving the Germans a route through to Ypres but British troops flanked the road on both sides, inflicting heavy casualties. Every last man was thrown into this desperate defense, the line finally being held by five army cooks in a roadside farm cottage.
Eventually, exhausted and bombarded by the Allied artillery, the Germans withdrew.
Limping to the End
Fighting continued sporadically over the following days, but there would be no more significant advances. The Ypres Salient had held.
The First Battle of Ypres demonstrated what coordinated artillery would go on to achieve throughout the war; dug in troops holding back endless assaults.
More than anything, it showed the futility of both sides plans in the face of the enemy. As British Commander, Sir John French said during the battle, “How the hell do you expect me to carry out my plan of the campaign if you keep bringing up these blasted [German] divisions?”
Sources:
David Chandler and Ian Beckett (Eds) (1994), The Oxford History of the British Army.
Martin Marix Evans (2002), Over the Top: Great Battles of the First World War.
Richard Holmes, ed. (2001), The Oxford Companion to Military History.