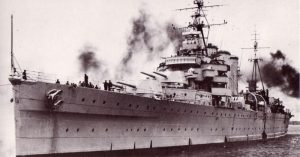
His Majesty’s Australian Ship or HMAS Australia II was a warship in the Royal Australian Navy (RAN). She was one of two 10,000 ton, County Class heavy cruisers ordered by the Australian government as part of a five-year naval development program that started in 1924 and ended in 1929.
She was a real beauty with lots of experience to her aesthetics as well. Commissioned on 24 April 1928, she was actively involved in several engagements in the War in the Pacific.

Under the navigational control of Captain Harold Farncomb, Australia and HMNZS Leander sailed from Sydney to Wellington. In February 1942, the Australian cruiser became the flagship of the newly formed Allied Naval Squadron, henceforth referred to as ANZAC squadron.
The ANZAC squadron, formed on 12 February 1942 under the command of Royal Navy Rear Admiral John Gregory Crace, was an allied naval warship task force created with the sole purpose of defending northeast Australia and the surrounding area during the Pacific campaign of World War II.

The squadron consisted of cruisers and destroyers from the navies of Australia, New Zealand, and the United States.
Having been assigned to protect Gasmata in New Britain in early March, Australia was recalled on 7 March and was reassigned shortly after to provide long range cover for the American aircraft carriers USS Lexington and USS Yorktown while they launched an air raid in retaliation for the capture of Lae and Salamaua by the Imperial Japanese Navy. After this assignment, the ANZAC squadron sailed for Nouméa.

Battle of the Coral Sea
On 22 April 1942, the ANZAC squadron was absorbed by the South West Pacific Area under the command of United States Army General Douglas MacArthur, and the ANZAC squadron was renamed Task Force 44. The New Zealand Cruisers passed to the control of the South Pacific Area. Australia remained flagship of Task Force 44 and she returned to Sydney in late April for a week of repairs to her damaged outer port propeller shaft.

Around this time, the Americans intercepted transmissions from Japanese commanders regarding “Operation Moresby” that was to take place on the north coast of Australia. The United States Navy’s Signals Intelligence Unit at Corregidor Island, known as CAST and commanded by Lieutenant Rudolf J. Fabian, had been transferred to Melbourne and the unit had become a joint USN/RAN unit known as Fleet Radio Unit Melbourne.

This joint organization had improved at deciphering coded transmissions between commanders of the Japanese Imperial Navy, and through multiple streams of intercepted transmissions, they were able to gather reasonable intelligence that the Japanese were planning to invade Port Moresby. On 1 May, Australia set sail with Hobart to rendezvous with American forces in the Coral Sea.
Rear Admiral John G. Crace, who was embarked aboard Australia as commander of Task Force 44, received orders to take his ships including the cruisers Hobart and USS Chicago, and the destroyers USS Perkins, USS Walke and USS Farragut to the Jomard passage on 7 May. His orders were to engage any Japanese ships found sailing to Port Moresby, while U.S. carrier groups engaged a Japanese force headed for the Solomon Islands.

Seven hours after he received his orders, the ships reached their patrol areas and were fired on by a group of eleven unidentified aircraft at maximum range. The ships returned fire, but no damage was done by either side.
It was later discovered that the unidentified aircraft were, in fact, United States Army Air Forces (USAAF) and the incident had been one of friendly fire.

About an hour later, Task Force 44 was attacked by twelve Japanese twin-engine torpedo bombers. Australia and Chicago were able to maneuver out of the torpedoes’ paths and destroyed a minimum of five aircraft. Ten minutes later, nineteen Japanese heavy bombers attacked the Allied ships.
None of the ships were hit directly, and the only casualties were on the Chicago from shrapnel. Australia herself was surrounded by the spread of bombs but was relatively unscathed. A few minutes later the ships were attacked again by three heavy bombers, but this time, their trajectories were inaccurate. On both occasions, Australia was able to thwart the Japanese attack.

Meanwhile, to the east, Japanese aircraft attacked and sank the destroyer USS Sims and damaged the tanker USS Neosho, and American aircraft sank the Japanese light aircraft carrier Shōhō.
In the early morning of May 8, American and Japanese reconnaissance spotted each other almost simultaneously and scores of fighter, torpedo and dive bomber aircraft were launched from various carriers. In the ensuing battle, the Japanese carrier Shōkaku was heavily damaged as well as two American carriers, USS Yorktown and USS Lexington.

With only a damaged carrier remaining and without air cover, Japanese carrier force commander Vice Admiral Takeo Takagi withdrew from the battle, unaware that a slow fuel leak caused by a Japanese bomb hit on Lexington would eventually create a huge explosion and an uncontrollable fire that would lead to the abandonment of the ship.

Japan claimed a tactical victory, but the Australian/American alliance won the strategic battle and for the first time in history halted the invasion of the Imperial Japanese Navy. This battle singlehandedly broke the aura of invincibility surrounding the Japanese Navy and thwarted the invasion of Port Moresby.

For the first time since the war began, Australia was safe and the advancement of the Japanese empire through the Pacific was stopped. Although both the Japanese carrier Shōkaku and American carrier USS Yorktown were badly damaged in the battle, Yorktown was repaired in time to join the next conflict of the carriers in June 1942.


Read another story from us: Watch the WW2 Battle of the Coral Sea – In Color
