The Battle of Hamel was an offensive against German troops strategically holed up, in and around the high ground near the French town of Le Hamel. It occurred on the morning of July 4th, 1918.
The Battle of Hamel was significant for a number of reasons. The first was that the Australian attacking forces were supported by over 60 British tanks. They included Whippet Tanks, and the new Mark V Tanks—both being extremely maneuverable.
Second was the presence of American troops. Third was that Hamel was actually behind the German forward advance line achieved in April 1918. Fourth was that the combined Australian, British, and U.S. troops were commanded by an Australian officer: namely, Lieutenant General John Monash.

Although Monash was selected to plan the Allied attack, targeting the Hamel surrounds was actually the “brainchild” of General Henry Rawlinson, the commander of the British Fourth Army.

The last reason this battle is significant is that the Allies’ objectives were achieved in just a little over 90 minutes—93 minutes, to be precise. Beforehand, Monash had calculated the seizing of the Hamel objective would take 90 minutes (a testament to his military genius).

Battle Plan
General Monash had seen the carnage that had occurred before to Australian troops when an all-out assault was attempted. He was determined this was not going to be repeated at Hamel. So his battle plan involved a “creeping barrage,” which meant mobile artillery weapons would slowly move in front of his troops.
To do this he would need more than what was available from the Australian armory. Accordingly he requested, and received, help from the British and French. The tally of this help was 302 heavy guns and 326 field pieces. It is fair to say that the assistance given to Monash was one of the prime reasons for the successful operation at Hamel.

Australian & U.S. Forces Combine
As early as June 1918, General Rawlinson suggested to General Monash that U.S. forces could gain experience and also assist the Australians when they attacked Hamel and the surrounds.
There was some initial confusion by the commander of the U.S. 33rd Division, General George Bell, who only attached two companies to the Australian attacking forces at first—about 500 men. However, after further consultations an additional eight U.S companies were attached.

These troops were no doubt beneficial to the successful outcome of the Battle of Hamel. The Australian and U.S. forces were compatible, and many opportunities were seized to take photographs together. These photographs would have been keenly accepted by the populations at home in each country.

German Defenses
The German troops in the Hamel surrounds consisted of about 20,000 men. They were subjected to Allied artillery fire—including gas—for about one week prior to the main attack. This did not produce many casualties and, in the main, gave the Germans time to prepare for what they knew was to come—an all-out attack.
The German defenses were from the 13th Division and the 43rd Reserve Division under the command of General Georg von der Marwitz. Marwitz was an exceptional commander, and during WWI he had two commands, namely, the Second Army and the Fifth Army.
He was a realist in the true sense, and in the beginning of November 1918 he would suggest to his superiors that an armistice should be sought because of the huge losses German forces were experiencing. In less than two weeks that became a reality.

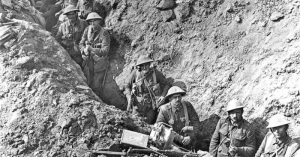
The Battle of Hamel Commences
Before daylight on the 4th of July, Allied artillery began a concentrated barrage on the German lines. This was nothing new to the German defenders, but the time of the barrage was earlier than what was normally expected.
Then at first light—before daylight broke—a squadron of British Royal Air Force bombers began dropping 25-pound bombs on the German lines. This signaled to the Germans that something else was imminent.

After the bombers had finished their work it was then time for the previously mentioned “creeping barrage” to begin its slow movement to the German lines. Immediately behind this came the British, Australian, and U.S. forces.
The first objective for the Australians was a German defensive position named Pear Trench. What should have been a straightforward operation by the 15th Battalion stalled because of an entanglement of barbed wire. Once the Australians, assisted by a number of U.S. troops, had time to rest for a while, they were joined by reinforcements.

Then the next objective was to take an area called Hamel Woods. This was defended by the German 4th, 14th, and 15th Brigades. Eventually this position was also taken, as was the town of Hamel itself. All of this was achieved before the breaking of dawn proper.
Daylight would reveal what the Allied forces had achieved. Continued German resistance did prevail for some time. But the Battle of Hamel was successful in just 93 minutes.
What was then required by the Australian and U.S. forces was to consolidate the captured positions in and around Hamel. This they did, but German counterattacks persisted for some days.

Aftermath
The casualty numbers for the Battle of Hamel were not as large as they were in some other battles on the Western Front. The fact that it only lasted 93 minutes helped, but even so, there were 1,062 Australian casualties, of which 800 lost their lives.
U.S. casualties amounted to 176, but the number of Americans who participated in the final assault was, numerically, considerably less than that of the Australians.
Read another story from us: The Australians at Pozieres: Battle of the Somme 1916
What is noteworthy about the German casualties, apart from the over 2,000 who lost their lives, is that over 1,600 prisoners were taken.
General Monash would later go on to plan the last major battle of WWI—the Battle of Amiens on August 8th, 1918. That battle is generally considered as the final turning point in WWI.