Of the many naval encounters between the Allies and the Axis forces in World War II, the sea battle between the German auxiliary cruiser Kormoran and the Australian light cruiser HMAS Sydney was not by any means the largest or bloodiest naval battle of the war. It did nonetheless make headlines and fascinate historians and researchers for decades afterwards, because the events of the battle were shrouded in mystery and controversy.
This was because of three main factors: firstly, HMAS Sydney was sunk with no survivors. All 645 Australian seamen were lost. Second, the location of the wreckage of Sydney (and Kormoran, which was also sunk) remained a mystery until decades after the war, in 2008.
And finally, months after the battle a mysterious, unidentified body washed up on Christmas Island – a body many believed was that of the only survivor of the sinking of Sydney.
In the wake of the battle, a number of conspiracy theories sprang up. These included theories that the Germans had massacred the survivors of Sydney, that the Empire of Japan had secretly been involved in the battle before they officially declared war in December 1941, and that the Germans broke the laws of war in the encounter. None of these have ever been proven, though.

The events that would lead to the sinking of HMAS Sydney began on 19 November 1941 off the west coast of Australia, around 122 miles from Dirk Hartog Island.
The light cruiser, armed with eight six-inch guns, along with eight four-inch anti-aircraft guns, nine .303 inch machine guns, and eight 21-inch torpedo tubes, was patrolling Australian waters due to the increased threat from German raiders that had been seen in the area. At around 4:00 PM, Sydney spotted a ship on the horizon.

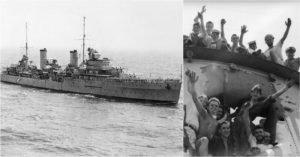
The ship was disguised as the Dutch merchant vessel Straat Malakka – but was actually Kormoran, under the command of Commander Theodor Detmers. The vessel had originally been a merchant ship and had been modified for war, but her armor and guns were inferior to those of Sydney. Detmers knew that the only way his ship would stand a chance against the superior Australian cruiser was through trickery.
Sydney demanded, via signal, that the “merchant” ship identify herself – which Kormoran did, flying the Dutch flag and pretending to be the Straat Malakka. Through a series of exchanges, Kormoran lured Sydney closer and closer, until the Australian ship was close enough that the advantages offered by her superior armor and weaponry would be negated.
When Detmers saw that Sydney was within lethal firing range, he abruptly dropped the Dutch flag and instead raised the German Navy (Kriegsmarine) ensign instead, and opened fire.

Some of the conspiracy theories allege that the German ship was flying a surrender flag to lure Sydney close enough, and that Kormoran attacked without flying her battle ensign – either of which would have constituted a war crime. Neither of these theories has ever been proven, though.
The battle, once begun, was vicious and short, with the Germans opening hostilities with direct hit salvos from two of Kormorant‘s main guns. The Australians responded in kind, but according to the German survivors, their first salvo missed.
The ships battered each other for the next thirty minutes, and after the last shots were fired at around 6:00 PM, Kormoran was dead in the water and Sydney was moving south-east, apparently not under any control. Both ships were heavily damaged and on fire.

German survivors stated that they saw fire still lighting up the sky on the horizon until almost midnight. Sydney ended up splitting in two, with the bow tearing off, and after this it sank quickly. The speed at which it went under made it impossible for any life rafts to make it off the sinking ship, and all hands were lost – making it the largest loss of life for the Royal Australian Navy.
On Kormoran, an out of control fire was spreading, and Detmers realized that he would have to abandon ship, so at 6:25 he ordered the ship to be abandoned and scuttled. During the abandoning of the ship, one of the life rafts sank, and all but three men on it drowned.
The German survivors were picked up by various Australian vessels on the 23rd, 24th and 25th of November, and spent the rest of the war in prisoner of war camps. There, they were interrogated extensively about the sinking of HMAS Sydney.

Bundesarchiv, Bild 146-1985-117-02A / CC-BY-SA 3.0
A large scale air and sea search for the any Australian survivors and the wreckage of Sydney was launched, but abandoned when nothing was found.
A damaged but empty carley float, an invertible life raft often used on warships, was picked up by HMAS Heros on November 28, but a far more intriguing discovery was made in February the following year: another carley float was found. This one washed up on Christmas Island, and what made it especially interesting was that it had a body in it.

The corpse discovered on the carley float was already decomposing, and much of the flesh had been torn off, either by sea birds or fish. The boiler suit the man was wearing was sun-bleached white, but had formerly been blue. There were no dog tags or personal items on the body which could be used to identify it.
The outer covering of the craft was damaged from either machine gun fire or shrapnel, which led to the germination of another conspiracy theory: that the Germans had massacred any Australian survivors. There has been no conclusive evidence to support this, though.

The body was buried with full military honors, as it was assumed that he was a RAN sailor. It was not known whether an autopsy was performed, because the island was taken over and occupied by the Japanese, and most records were lost or destroyed. The location of the grave was also lost when the Japanese occupied the island.
With the controversy surrounding the loss of HMAS Sydney persisting for decades after the war, the RAN searched the island in 2001, but failed to find the grave of the unidentified man.
Read another story from us: Always in Action – The HMAS Australia II with Amazing Photos
A second search in 2006 was successful, and the body was exhumed. It was determined that he had died from a fragment of shrapnel embedded in his skull. The wreckages of both Sydney and Kormoran were then discovered in 2008. With these recent discoveries, most of the mystery and controversy surrounding the sinking of HMAS Sydney has finally been laid to rest.