Hills and other kinds of elevated terrain have been recognized for their importance in battle ever since the dawn of war. This fact has held true in the age of modern warfare, where they are valued for purposes of both battlefield observation and providing commanding fields of fire. Over the course of the second world war between the western allies and the Germans, there came to be a number of such elevated features that attained major operational significance for both sides, and consequently saw much bitter fighting. This article will explore five of these most contested pieces of terrain over the course of the entire war on the western front.
5. Hill 609
This position proved one of the last major obstacles to the final allied victory in Tunisia. Assigned to the US 34th Infantry Division, the fighting began on the 27th of April 1943 when the Americans began attacks against the hill and the surrounding heights. The going was tough, due to the hill’s steep slopes and the mutual support from other German-occupied hills nearby. For the first three days the Germans were able to hold off the US attacks in hard fighting, however attacks by US forces everywhere as well as the deteriorating German supply position began to take its strain on the defenders.

The hill was finally captured by the Americans on the 30th of the month, and they were subsequently able to hold it against German counterattacks throughout the subsequent night and day. The capture of the hill saw one of the last strong natural German defensive positions in Tunisia fall, and the general capitulation of the German forces in Africa followed shortly afterwards.
4. Hill 593
During the battle of Monte Cassino, Hill 593 (or Calvary Hill, as it came to be known) was the scene of some of the fiercest fighting in the whole battle. Located west of Monastery Hill, and right at the southern tip of Snakeshead ridge, its capture would result in the German position at Monte Cassino being cut off. As a result, it was subject to heavy Allied attacks in the first, second and fourth battles of Monte Cassino.

Due to the hill’s terrain, which was very favourable to the defenders, as well as its being held by elite German paratroopers, every allied assault was repulsed. The Americans were the first to try, and though the hill ended up changing hands six times in four days, the Germans remained in final possession. The assault by British and Indian troops in the second battle also failed, with some units sustaining 50% casualties. The Poles went in last, and despite deploying two divisions against a vastly outnumbered defending force, they were similarly massacred. The fighting for the hill, which again changed hands multiple times, saw the Poles lose almost 4,000 men. As a result, the battles for Calvary hill would go down as one of the most successful German defensive actions in the west.
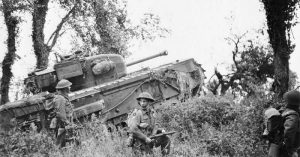
3. Hill 400
Hill 400, otherwise known as Castle Hill, was one of the key positions in the whole of the Hürtgen forest during the winter of 1944-45. A combination of bad weather, almost impenetrable forest and steep slopes (as much as 45 degrees) resulted in its transformation into a living hell for both sides. Attacks on the position by three US infantry divisions and later, by a combat command of 3,000 plus tanks, were all repulsed. Consequently, the US decided to try again, this time with a battalion of Rangers, the same ones that participated in the capture of Point-du-hoc.

Two companies, D and F, were chosen as the assault force. Despite murderous fire, the élan of the US forces shone through and the hill was captured in an energetic assault on the morning of December 7th. The rest of that day, and the following, saw a total of five German counterattacks each of 100-150 men. The rangers on the hill, at one point down to a mere 25 men, were nonetheless able to hold their ground even in the face of well-trained German Fallschirmjäger, who participated in the later counterattacks. The rangers thus succeeded in taking and holding the hill with a couple hundred men where earlier attacks by thousands failed. Unfortunately, in the end the Germans eventually retook the hill from a different US infantry unit just over a week later, holding it until February 1945.
2) Hill 262
Hill 262 was the northernmost of two hills at Mont Ormel ridge, and was the site of a fierce battle in the closing stages of the battle of Normandy. By mid-August 1944 the allies were on the verge of encircling a huge number of German soldiers at Falaise, with just a small gap remaining. Hill 262, which lay right in the middle of it, was assigned as an objective to the Polish armoured division. They were able to capture it on the 19th of August, and from there were immediately able to wreak carnage on the retreating German columns.

The Germans, quick to spot a problem, launched immediate counterattacks with many of their best divisions against the hill the next day. Although they were able to reduce the pressure on retreating forces, they never succeeded in wresting control of the hill due to bitter Polish resistance. As a result they suffered much greater losses in their retreat than they would have otherwise. The Poles, though reduced to 110 men, were able to hold until relieved on the 21st of August.
1. Hill 112
Located just to the southwest of Caen, Hill 112 was one of the dominant features of an otherwise somewhat low-lying landscape, and thus was a place of major importance to both sides during the battle of Normandy. During Operation Epsom, the hill was briefly seized by the allies, but due to its exposed position at the end of a long corridor it was evacuated. The real test came during Operation Jupiter the next month, when the British attempted to seize the hill and the surrounding villages. Though they captured the hill more than once, the British were never able to hold it due to heavy German fire and counterattacks. Despite the heavy cost to both sides, by the end of the battle the place had become a no-man’s land, remaining as such for the rest of the month. After a German withdrawal, it was finally captured with barely a shot being fired on the 4th of August.