
We are used to viewing the war in black and white. So when you get to see colourised images it brings the war to us with a different dimension. The images are produced by using the colourised technique and are by the ‘Colourise History Group’ and you can follow the guys via their Facebook group WW2 Colourised Photos
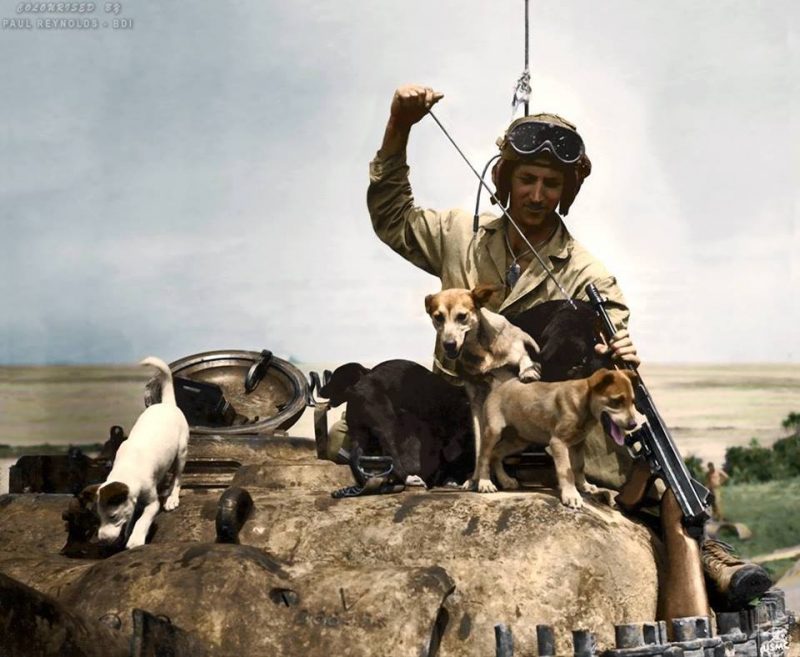 US Marine Tanker, Private Bruce Rutherford from Bristol, Tennessee is seen cleaning his Thompson submachine gun while playing with rescued puppies ‘Nanci’, ‘Shoto’, ‘Sake’, ‘Zero’, ‘Banzai’, and ‘Okinawa’ on the Pacific Island of Okinawa. 1st of June 1945.
Our research tells us (so far) that this Marine could be sitting on a Sherman M4A2 of the 1st Marine Tank Regiment.
The two Marine units on Okinawa were the veteran 1st Btn., who were equipped with the M4A2 and the newer 6th Battalion using the M4A3.
The 1st Battalion started the campaign with 47 M4A2 tanks in May. During the course of the fighting, operational strength plummeted from 47 to 28 tanks by June 22nd. The heaviest casualties were during the fighting for Kunishi Ridge in mid-June, with a single day’s loss of 21 tanks.
“The Marines on Kunishi critically needed reinforcements and resupplies; their growing number of wounded needed evacuation. Only the Sherman medium tank had the bulk and mobility to provide relief. The next several days marked the finest achievements of the 1st Tank Battalion, even at the loss of 21 of its Shermans to enemy fire. By removing two crewmen, the tankers could stuff six replacement riflemen inside each vehicle. Personnel exchanges once atop the hill were another matter. No one could stand erect without getting shot, so all “transactions” had to take place via the escape hatch in the bottom of the tank’s hull. These scenes then became commonplace: a tank would lurch into the beleaguered Marine positions on Kunishi, remain buttoned up while the replacement troops slithered out of the escape hatch carrying ammo, rations, plasma, and water; then other Marines would crawl under, dragging their wounded comrades on ponchos and manhandle them into the small hole. For those badly wounded who lacked this flexibility, the only option was the dubious privilege of riding back down to safety while lashed to a stretcher topside behind the turret. Tank drivers frequently sought to provide maximum protection to their exposed stretcher cases by backing down the entire 800-yard gauntlet. In this painstaking fashion the tankers managed to deliver 50 fresh troops and evacuate 35 wounded men the day following the 7th Marines’ night attack.” (by Colonel Joseph H. Alexander, USMC Ret)
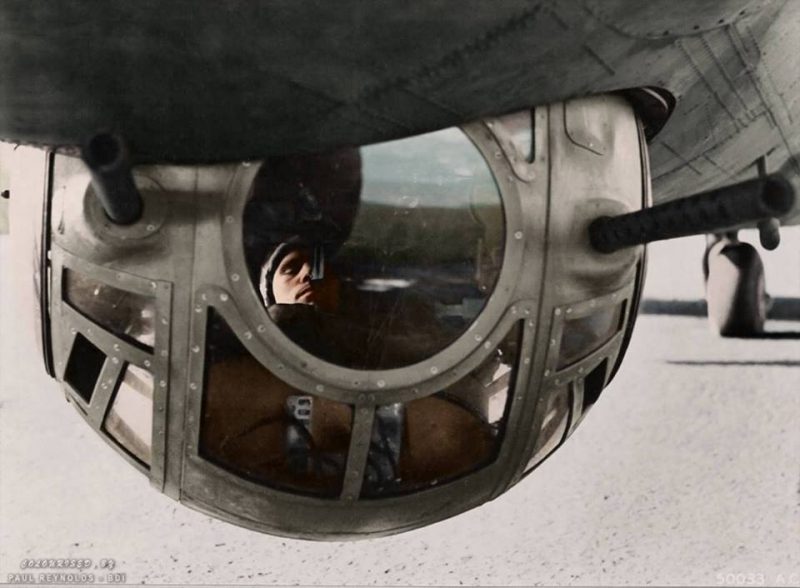
Colourised by Paul Reynolds. https://www.facebook.com/
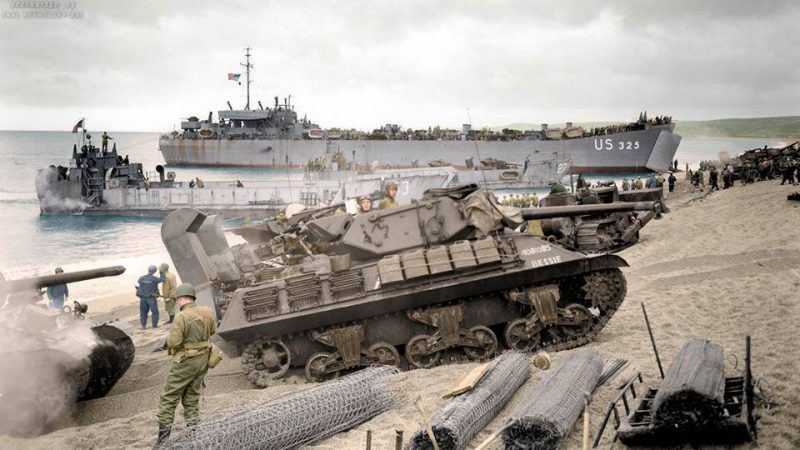 Operation Tiger’ the training exercise on Slapton Sands in Devon, England. Spring 1944.
In late 1943, as part of the build-up to D-day, the British Government set up a training ground at Slapton Sands to be used by Force “U”, the American forces tasked with landing on Utah Beach. Slapton Beach was selected for its similarity to Utah Beach: a gravel beach, followed by a strip of land and then a lake.
The Photo:
In the foreground on the sand are rolls of mesh ‘Sommerfeld Tracking’ (named after German expatriate engineer, Kurt Joachim Sommerfeld), used to strengthen weak and viscous surfaces. In the center of the frame is an American Sherman M-10 tank destroyer named “Bessie” equipped with special boxes that protected the engine from the ingress of water, also visible is a Caterpillar D-8 bulldozer, used by the allies in landings for clearing the beaches.
The photo also shows two landing craft LCT class numbered 27 and 53.
At the back, is a large tank landing ship LST-325, which subsequently was involved in transporting troops and equipment onto the Normandy beaches.
After the war, she was sold to Greece and served in it’s Navy until 1999. In 2000 LST 325 was bought back by the United States and now serves as a memorial to ships of this class in Evansville Indiana.
https://www.facebook.com/
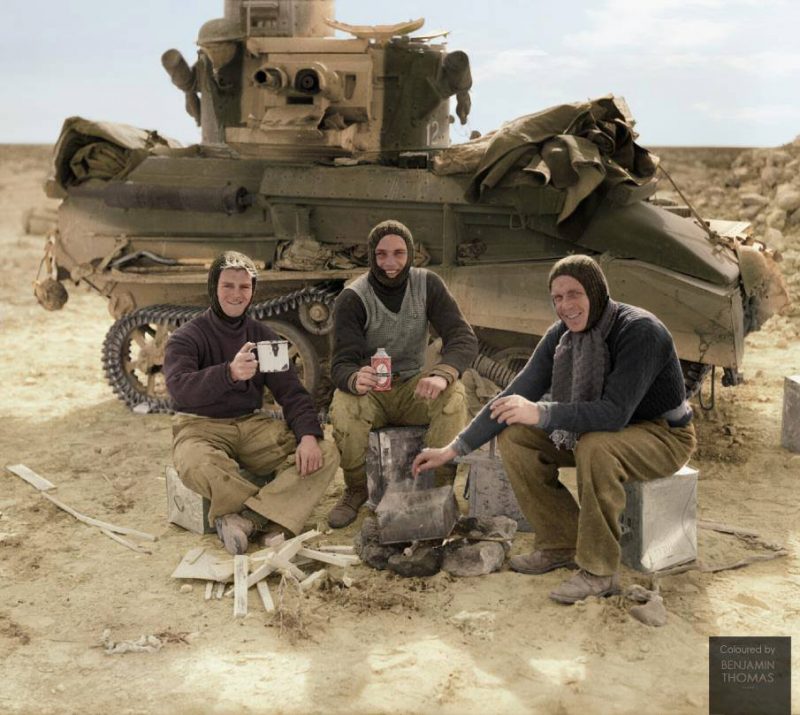
The crew of a British Light Tank Mk.VIB having a “brew up” and cooking their Christmas dinner beside their vehicle, in Libya, North Africa. 31st of December 1940. (note – they are sitting on fuel or water containers and using a cut in half, empty can (a “flimsy” – the infamous 4-Gallon non-returnable petrol tin) for heating the food, referred to at the time as a “Banghazi Fire”. The tanker seated in the middle is holding a can of ‘Pilsner Lager’.)
(© IWM E 1501)
Capt. G Keating – No 1 Army Film & Photographic Unit.
The Mk VIB was also used in the North African campaign against the Italians late in 1940 with the 3rd Hussars and the 7th Armoured Division. Late in 1940 the British had 200 light tanks (presumably the Mk VIB) along with 75 cruiser tanks (A9, A10, A13) and 45 Matilda IIs. An attack by the 3rd Hussars on 12 December 1940 resulted in the tanks getting bogged down in salt pans and severely mauled. The 7th Armoured Division had 100 left on 3 January 1941 and 120 tanks on 21 January at which time they were used in flanking far into the rear and gathering up scattered Italian troops, sometimes joining or leaving the main attacks to the Cruiser and Matilda II tanks. The 2nd RTR continued to battle the Italians with light tanks as late as 6 February 1941.
(Colourised by Benjamin Thomas from Australia) https://www.facebook.com/
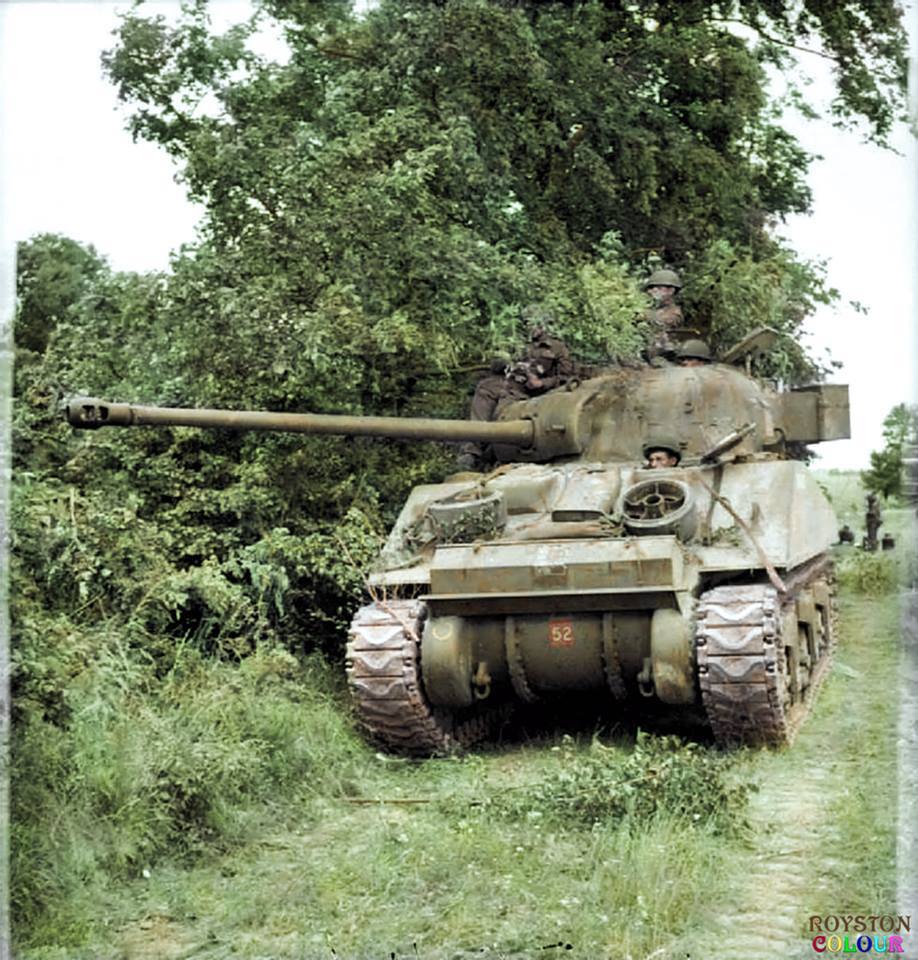
A British Sherman VC ‘Firefly’ (Medium Tank, M4A4) of ‘C’ Squadron,The Staffordshire Yeomanry, 27th Armoured Brigade in the vicinity of Lebisey Wood, north of Caen, Normandy.
7th -13th of June 1944.
“C” Squadron in the Lebisey area was being shelled fairly heavily. Lieutenant Winterhalder was killed when his tank was hit in an engagement with two enemy tanks near the crossing of the anti-tank obstacle. The infantry, too, had suffered serious casualties during their heavy fighting and, since the Norfolk and Warwickshire Regiments were not available to assist in clearing Lebisey Wood, being still engaged in mopping up the strong-point farther back, it was decided to withdraw from that area and consolidate behind the anti-tank obstacle. At last light the Regiment leaguered west of Bieville and, in spite of numerous snipers in the adjacent woods, was not seriously disturbed during the night. On the whole, the day had gone really well for the Regiment. Apart from the loss of five Shermans of “B” Squadron to the fire of a German 88-mm. gun, only two tanks had been hit during the encounter with the enemy armour and neither of them had been put out of action. The Regiment had destroyed seven enemy tanks and disabled two others, all of them Mark IV Specials. Also on the credit side was the fact that a reasonably firm bridgehead had been established, the occupation of the high ground by the tanks of the Staffordshire Yeomanry enabling the follow-up personnel and armour to land over “White” beach without observation by the enemy, apart from the air.
At first light on 7th June the Regiment, less “A” Squadron, moved forward again on to the ridge and took up battle positions facing south and south-west. “A” Squadron were detailed to assist the Norfolk and Warwickshire Regiments in an attack to clear Lebisey Wood and penetrate to the open ground beyond, but it had been heavily reinforced by the enemy during the night and all the attacks were unsuccessful, the infantry again suffering heavy losses. At last light the operation was abandoned and “A” Squadron returned to the Regimental area while 185th Infantry Brigade consolidated north of the anti-tank obstacle.
There was no change in the position on 8th June and it was possible, from the various reports coming in, to form some sort of view of the success of the whole operation. The Canadians, landing on the right of the Division, had run into fierce resistance on D Day and had been unable to advance. On the 7th and 8th, however, they had forced their way forward and by noon on the 8th had linked up with the right flank of the British sector. Farther west again, the Americans had sustained heavy casualties during their landings, but had fought their way ashore and established a reasonably secure bridgehead. The capture of Bayeux on the 8th was an important success in the fighting that was then going on to link up the initial bridgeheads behind a continuous line covering the whole of the landing area.
For the next few days the Staffordshire Yeomanry remained in long-range support of the infantry and in observation duties from the high ground near Periers-sur-le-Dan. The Reconnaissance Troop was active during this period with extensive patrolling towards Lebisey Wood, and on the l0th lost one Honey which was knocked out when advancing along the main road, Lance-Corporal Humphreys being killed. On 12th June the Staffordshire Yeomanry relieved the East Riding Yeomanry in the area of Cambes and made contact with the Canadians on their right flank. There was heavy enemy mortar fire during the day which caused a number of casualties. During 14th June a small probing sortie was sent out on the left flank of the Regiment’s front under Major Farquhar, but the leading Honey in the Reconnaissance Troop was hit at close range by anti-tank fire and Major Farquhar ordered the patrol to return.
On the following day the Staffordshire Yeomanry moved back to their previous positions near Periers-sur-le-Dan and remained in that area for the next three weeks. (Staffordshire Yeomanry in Normandy – WarChronicle).
(nb. Each regiment marked their tanks with symbols; a triangle for ‘A’ squadron, a square for ‘B’ squadron and a circle for ‘C’ squadron, Staffs Yeo in yellow. The number ’52’ on a red square background indicated the Staffs Yeomanry)
(Colourised by Royston Leonard UK) https://www.facebook.com/
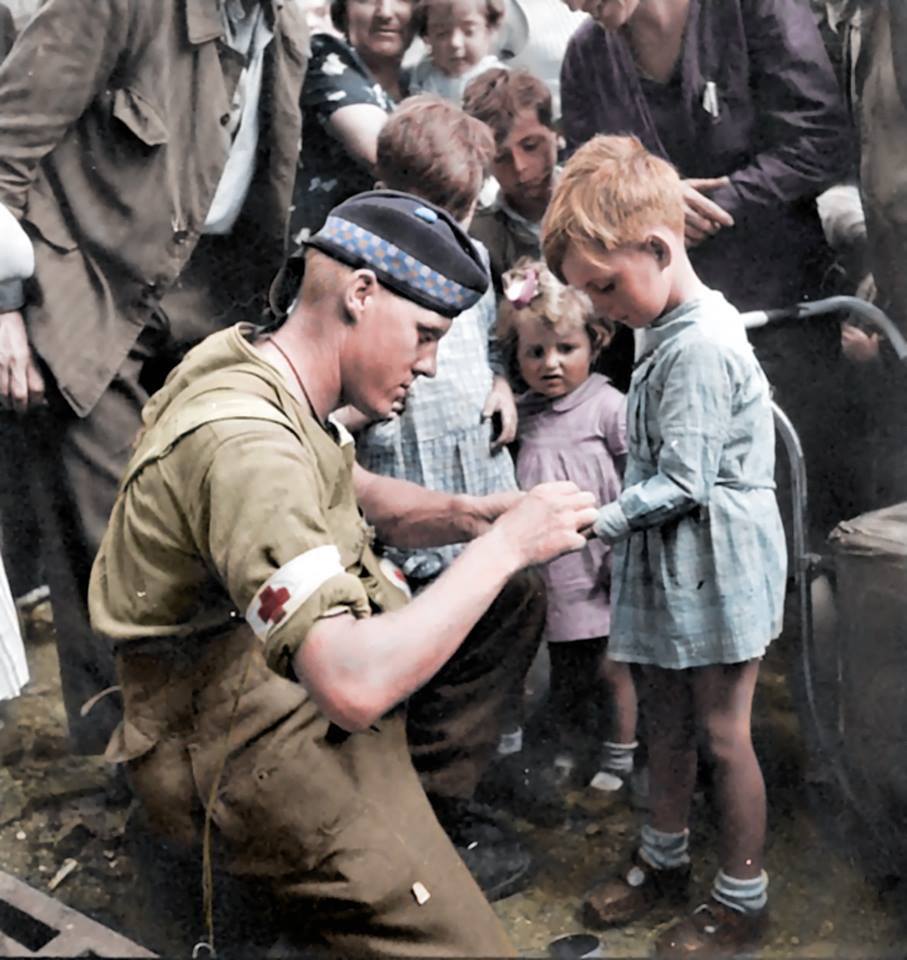
Private G.R. MacDonald of The Toronto Scottish Regiment (M.G.) 2nd Canadian Infantry Division Support Btn., giving first aid to injured French children in Brionne, Haute-Normandie, France on the 25th of August 1944.
The 2nd Canadian Corps had reached the line of the River Risle east of Bernay, which was captured on the 24th August. Under orders issued by General Simonds on the 22nd of August, they were moving on the left, through Brionne, directed on Bourgtheroulde. The 3rd Division was in the centre, moving by way of Orbec upon the Elbeuf area. On the right the 4th Canadian Armoured Division was following the axis Broglie-Bernay-Le Neubourg, directed on the region about Pont de l’Arche. The advance was being led and covered by the 18th Armoured Car Regiment (12th Manitoba Dragoons) and the divisions’ reconnaissance regiments.
Resistance to the 2nd Corps had so far been insignificant; the enemy was chiefly intent on getting away, and such opposition as he offered was merely delaying actions by rearguards which withdrew as soon as strong pressure was applied. Indeed, the most memorable feature of these days was the tumultuous and heartfelt welcome which the liberated people gave our columns. The historian of the 10th Brigade wrote later, “Will Bernay ever be forgotten? Bernay where the people stood from morning till night, at times in the pouring rain, and at times in the August sun. Bernay where they never tired of waving, of throwing flowers or fruit, of giving their best wines and spirits to some halted column. . . .” But in every town and hamlet the reception was much the same. It was an experience to move the toughest soldier.(nb. We believe that this could be the same Private George Robert MacDonald (Service Nº F/97949) of the 11th Field Ambulance, Royal Canadian Army Medical Corps attached to the 2nd Div., who was sadly KIA in the Bedburg area of Germany on the 19th of February 1945 (aged 21).
(Colourised by Royston Leonard UK)
https://www.facebook.com/
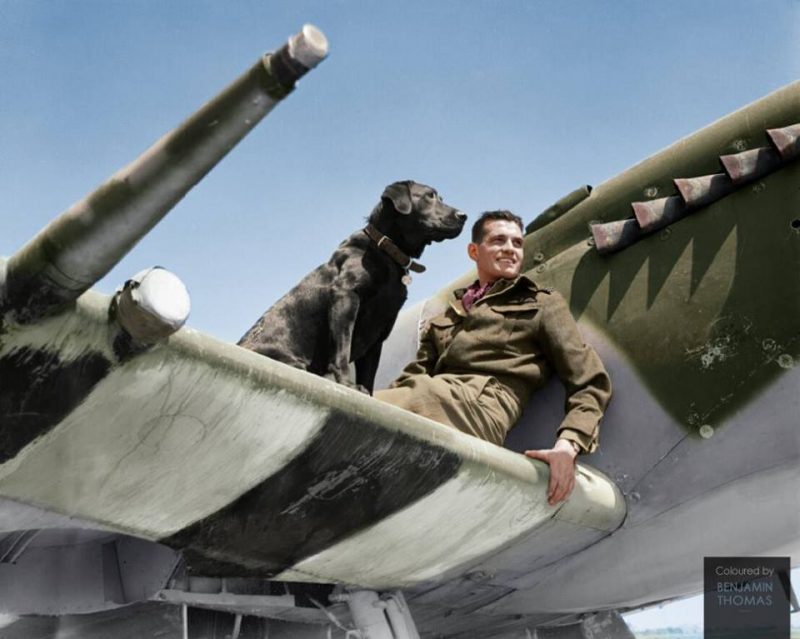
Wing Commander James Edgar ‘Johnnie’ Johnson DSO & 2 Bars, DFC & Bar, commanding No. 144 (Canadian) Wing, on the the wing of his Supermarine Spitfire Mk IX with his Labrador retriever ‘Sally’, at Bazenville Landing Ground in Normandy.
31st of July 1944.(nb He is seen here wearing an RAF issue Battle Dress Blouse in Khaki often worn by Australian pilots in the Middle East and Italy)
Johnson had been interested in aviation since his youth, and applied to join the RAF; initially rejected, first on social, and then on medical grounds, in August 1939 he was eventually accepted. An old rugby injury caused problems during his early training and flying career, resulting in him missing the campaigns in the Low Countries and France and the Battle of Britain. In 1940 Johnson had an operation to reset his injured collarbone, and began flying regularly. He took part in the offensive sweeps over German-occupied Europe from 1941 to 1944, almost without rest. By late June 1944, Johnnie Johnson surpassed the record 32 victories of “Sailor” Malan which was highly publicised by the press. Johnnie emphasised that “it was the duty of any leader to have their pilots destroy as many enemy aircraft as possible, not gain personal victories”. “Teamwork was essential to ensure a maximum offensive and defensive effectiveness, flushing out and stalking the enemy to bring as many guns to bear as possible”.
In early July the three Canadian Spitfire Wings, 126, 127 and 144 were formed into two Wings, Nos. 126 and 127 with Johnnie Johnson commanding 127 Wing comprised of 404, 441 and 442 Squadrons of the RCAF. On August 23rd, Johnnie Johnson shot down two FW190s and his aircraft was hit for the first time by enemy fire. After the combat, he found himself separated from the Wing ( a most dangerous situation) and he proceeded to join a formation of six aircraft after a friendly wing waggle from its leader. He discovered too late that he had inadvertently joined up with a formation of Me109s! Miraculously he escaped by pulling up and climbing into the sun at full power. When the supercharger kicked in he got the extra boost of speed that he needed and he escaped safely but not without taking a cannon shell in his wing root. Upon returning to base he obtained another Spitfire and again went right back into combat.
On the 27th of September 1944, Johnnie Johnson dove out of the sun to claim his 38th and final aerial victory. Through 515 operational sorties he was fortunate enough to only be holed once. In March of 1945, Johnnie Johnson was promoted to Group Captain and given command of No. 125 Wing (in an administrative role) but he often led the Wing or a Squadron. Johnson was one of the highest decorated pilots to emerge from the War and continued his career in the RAF serving in the Korean War until his retirement in 1965 with the rank of Air Vice Marshal. (He died on the 30th of January 2001 – aged 85) (© IWM CL 604) (Colourised by Benjamin Thomas from Australia)
Operation Tiger’ the training exercise on Slapton Sands in Devon, England. Spring 1944.
In late 1943, as part of the build-up to D-day, the British Government set up a training ground at Slapton Sands to be used by Force “U”, the American forces tasked with landing on Utah Beach. Slapton Beach was selected for its similarity to Utah Beach: a gravel beach, followed by a strip of land and then a lake.
The Photo:
In the foreground on the sand are rolls of mesh ‘Sommerfeld Tracking’ (named after German expatriate engineer, Kurt Joachim Sommerfeld), used to strengthen weak and viscous surfaces. In the center of the frame is an American Sherman M-10 tank destroyer named “Bessie” equipped with special boxes that protected the engine from the ingress of water, also visible is a Caterpillar D-8 bulldozer, used by the allies in landings for clearing the beaches. The photo also shows two landing craft LCT class numbered 27 and 53.
At the back, is a large tank landing ship LST-325, which subsequently was involved in transporting troops and equipment onto the Normandy beaches. After the war, she was sold to Greece and served in it’s Navy until 1999. In 2000 LST 325 was bought back by the United States and now serves as a memorial to ships of this class in Evansville Indiana.
https://www.facebook.com/
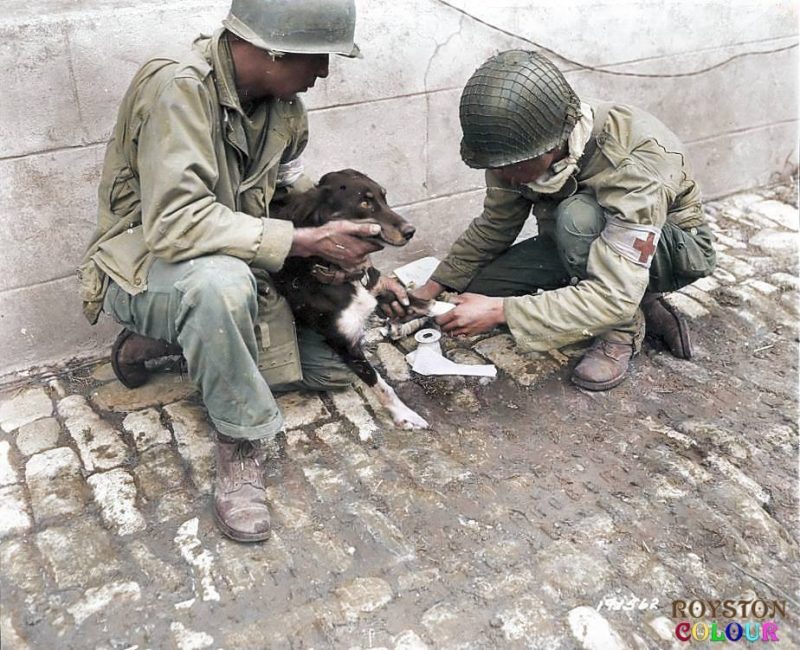
Two US 1st Army medics give first aid to an injured French dog they had found amid the ruins of Carentan in Normandy, France on July the 1st 1944.
(Colourised by Royston Leonard UK)
https://www.facebook.com/
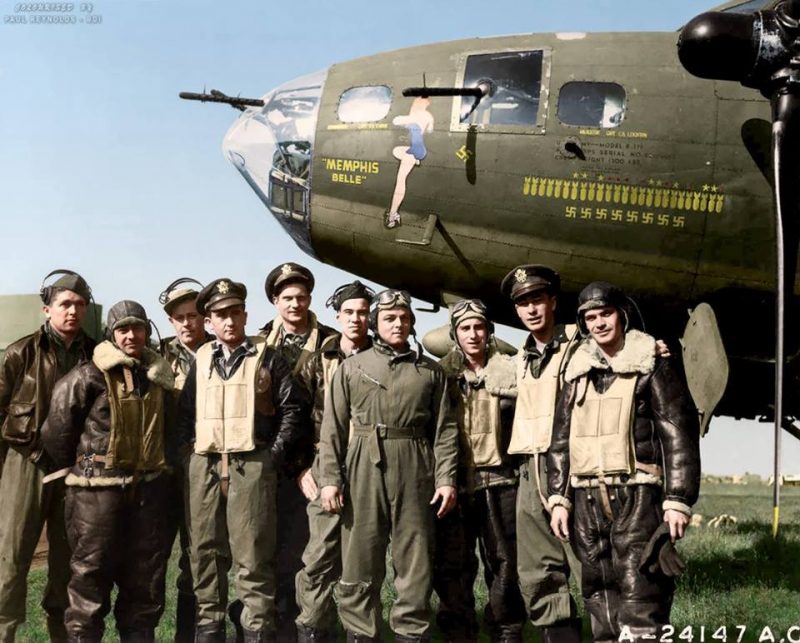
The “Memphis Belle” and crew, 7th of June 1943.
They are, left to right: Tech. Sgt. Harold P. Loch of Green Bay, Wis., top turret gunner; Staff Sgt. Cecil H. Scott of Altoona, Penn., ball turret gunner; Tech. Sgt. Robert J, Hanson of Walla Walla, Wash., radio operator; Capt. James A. Verinis, New Haven, Conn., co-pilot; Capt. Robert K. Morgan of Ashville, N. C., pilot; Capt. Charles B. Leighton of Lansing, Mich., navigator; Staff Sgt. John P. Quinlan of Yonkers, N. Y., tail gunner; Staff Sgt. Casimer A. Nastal of Detroit, Mich., waist gunner; Capt. Vincent B. Evans of Henderson, Texas, bombardier and Staff Sgt. Clarence E. Wichell of Oak Park, Ill., waist gunner.
The aircraft was one of the first B-17 United States Army Air Corps heavy bombers to complete 25 combat missions with her crew intact. The aircraft and crew then returned to the United States to sell war bonds.
The Memphis Belle, a Boeing-built B-17F-10-BO, USAAC Serial No. 41-24485, was added to the USAAC inventory on 15th July 1942, and delivered in September 1942 to the 91st Heavy Bombardment Group at Dow Field, Bangor, Maine. She deployed to Prestwick, Scotland, on 30th September 1942, to a temporary base at RAF Kimbolton on 1st October, and then to her permanent base at Bassingbourn, England, on 14th October. Each side of the fuselage bore the unit identification markings of the 324th Bomb Squadron (Heavy) – DF: A.
Captain Robert Morgan’s crew flew 29 combat missions with the 324th Bomb Squadron, all but four in the Memphis Belle.
The aircraft was the namesake of pilot Robert K. Morgan’s sweetheart, Margaret Polk, a resident of Memphis, Tennessee. Morgan originally intended to call the B-17, Little One, after his pet name for her, but after Morgan and his co-pilot, Jim Verinis, saw the movie ‘Lady for a Night’, in which the leading character owns a riverboat named the Memphis Belle, he proposed that name to his crew. Morgan then contacted George Petty at the offices of ‘Esquire’ magazine and asked him for a pinup drawing to go with the name, Petty supplied ‘Girl on a phone’ from the magazine’s April 1941 issue.
The 91st’s group artist Corporal Tony Starcer reproduced the famous Petty girl nose art on both sides of the forward fuselage, depicting her suit in blue on the aircraft’s port side and in red on the starboard. The nose art later included 25 bomb shapes, one for each mission credit, and eight swastika designs, one for each German aircraft claimed shot down by the crew of the Memphis Belle. Station and crew names were stencilled below station windows on the aircraft after her tour of duty was completed.
After the war, the Memphis Belle was saved from reclamation at Altus Air Force Base, Oklahoma where she had been consigned since 1 August 1945, by the efforts of the mayor of Memphis, Walter Chandler, and the city bought the B-17 for $350. She was flown to Memphis in July 1946 and stored until the summer of 1949 when she was placed on display at the National Guard armoury near the city’s fairgrounds. She sat out-of-doors into the 1980s, slowly deteriorating due to weather and vandalism. Souvenir hunters removed almost all of the interior components. Eventually no instruments were left in the cockpit, and virtually every removable piece of the aircraft’s interior had been scavenged, often severing the aircraft’s wiring and control cables in the process.
As of 2014, the aircraft is undergoing extensive restoration at the National Museum of the United States Air Force at Wright-Patterson AFB in Dayton, Ohio.
Note: The “Hell’s Angels” B-17 (41-24577) of the 303rd Bomb Group completed 25 combat missions on 13 May 1943, becoming the first B-17 to complete the feat, one week before the Memphis Belle.
(Colourisation and text by Paul Reynolds.
https://www.facebook.com/
Historic Military Photo Colourisations)
Colourised by Paul Reynolds.
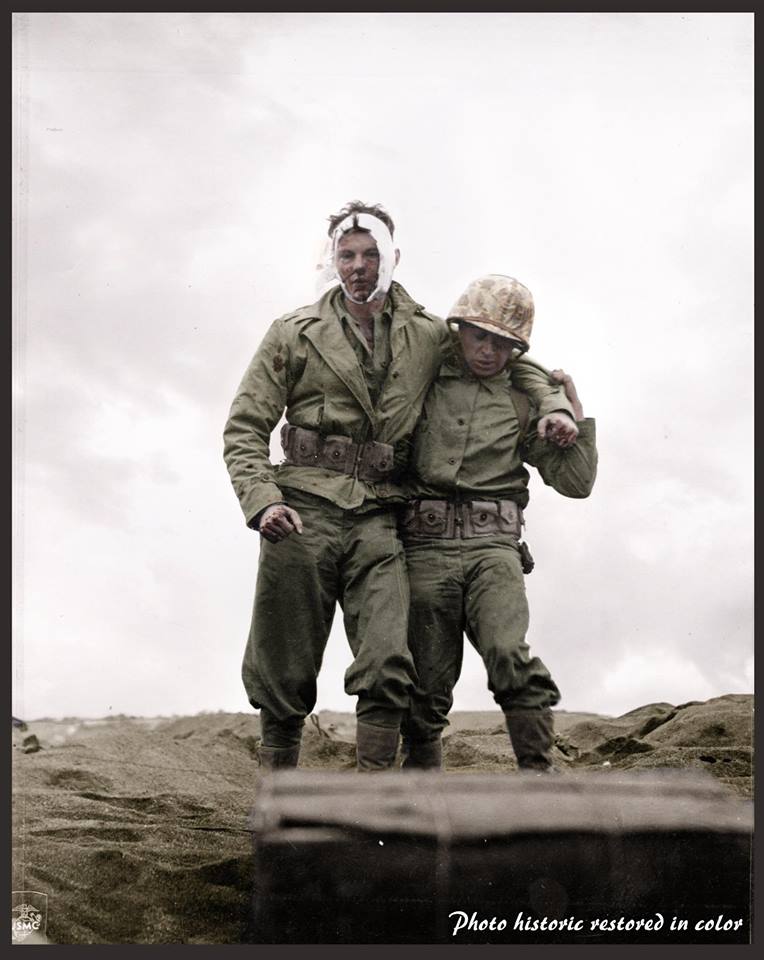
Nick Dalphonse and Robert ‘Plug’ O’Neil were cooks for the 23rd US Marine Regiment, 4th Marines Division, on Iwo Jima.
20th of February 1945 (D-Day+1) They had barely landed and the unit was constantly pinned down by enemy artillery, mortar, and machine-gun fire. A fellow soldier lost his composure and started popping off little bursts in all directions until O’Neil took his rifle. “It wasn’t bad enough that we could hardly move and then one of our leaders starts firing shots all over the place. We had to take his rifle from him.” Not much after that, they found themselves under attack. They were concerned with the numbers of Japanese soldiers coming at them and noticed their 0.50 caliber machine gun had been taken out by enemy fire. The fire fights toward the front were intense and the machine gun seemed like the better option than the M1.
“They were in and on us. We were fighting and men were falling. At some point we noticed they had taken out our machine gun. The M1 was a good rifle and I know what they will teach you about shooting, but there will be nights when you go to sleep pretty sore. I swear we could pop guys off from behind the trees that were on those islands. We figured the only way we were coming off of that island was behind the machine gun, and just decided that it may as well be us. We moved the men and started firing that gun. The shells we were firing were half inch diameter. We were in a pretty good fight and lost a lot of good men there. Afterwards, we took it the rest of the way taking turns at it. One evening we were firing the machine gun and that baby kept getting pretty hot.They just kept coming at us. All I can tell you is we were lucky our division was bringing along spare barrels.” They also helped in repulsing several Banzai attacks that occurred toward the end of operations on the island. O’Neil and Dalphonse were machine gunners for the better part of the operation.
Nick also cornered a Japanese officer as they made their way through the brush. He ended up with his rifle on him. O’Neil was scanning flicking his eye toward his buddy. Nick said it seemed like forever, but he could see that the soldier was of some rank and thought he should be taken back for questioning. So they took him back to their field leader. On Iwo Jima, heavy fire started as they made their way up the beach. O’Neil was hit by mortar fire and Nick bandaged and helped O’Neil back to the boat that would take him to the hospital ship. “There were shells flying all over the place and all of a sudden I saw ‘Plug’ running back with both hands on his face,” he added. “So I grabbed him, seen he was hit and took him back to the landing craft.” Staff Sgt. Dalphonse ended up taking charge of the remaining men after losing their platoon leader.Bob O’Neil account:
A mortar blast flipped him into the air, shredding his head and face.He remembered spitting out blood and teeth as Nick Dalphonse crudely bandaged his head and helped him back to the shoreline to catch a boat to a hospital ship. Along the way, a Marine photographer snapped a picture of Dalphonse supporting his wounded, towering buddy.Bob O’Neil’s wife, Betty, said her husband once told her how angry he was at being photographed at that moment. She recalled, “He said, ‘My head is killing me and this guy’s taking my picture?’ That’s why his hand is clenched in the picture.”(The photographer was Corporal Eugene Jones, also of the 4th Division.) Robert O’Neil died in 2002 aged 78. Nick Dalphonse aged 91 in 2014 (and may still alive today) (Colourised by Johhny Sirlande from Belgium)
https://www.facebook.com/
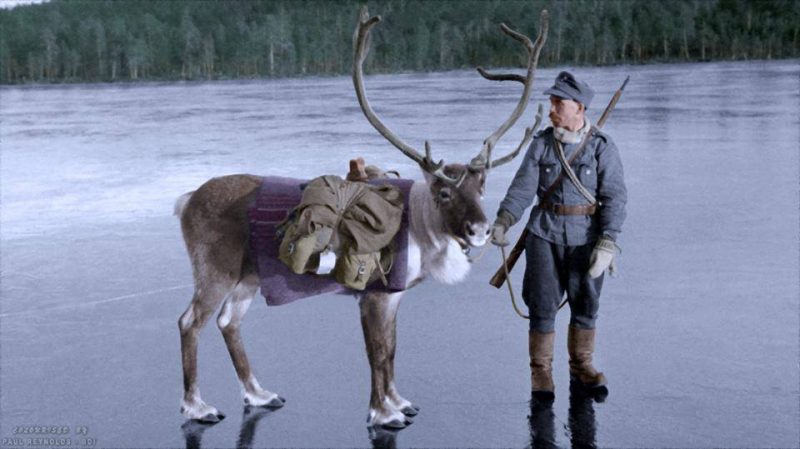
A Finnish soldier with a pack Reindeer, on an ice covered lake, near the tiny village of Nautsi, in northern Lapland, Finland.
October 26th 1941.
During the Continuation War (1941–1944) Finland was co-belligerent with Nazi Germany against the Soviet Union, and dependent on food, fuel and armament shipments from Germany. In spite of this, Finland retained an independent, democratic form of government. Moreover, during the war, Finland kept its army outside the German command structure despite numerous attempts by the Germans to tie them more tightly together.
Finland was in many ways a unique case: It was the only European country bordering the Soviet Union in 1939 which was still unoccupied by 1945. It was a country which sided with Germany, but in which native Jews and almost all refugees were safe from persecution. It was the only co-belligerent of Nazi Germany which maintained democracy throughout the war.
(Source: SA-Kuva.). Colourised by Paul Reynolds. https://www.facebook.com/

“Left to right, PVT John A. Quinn, 163rd Signal Photo Company, Syracuse, N.Y., PFC Bennett Fenberg, Detroit, Mich., of 163rd Signal Photo Company, and CPL Harry Koppelman, Cleveland, Ohio, 3rd Division, Hqs., enjoy their Christmas dinner on the hood of a jeep.” San Felice area, Italy. 25th of December 1943.
Photo by Goebel, 163rd Signal Photo Company. SC 186790, Credit NARA. (Colourised by Royston Leonard UK) https://www.facebook.com/
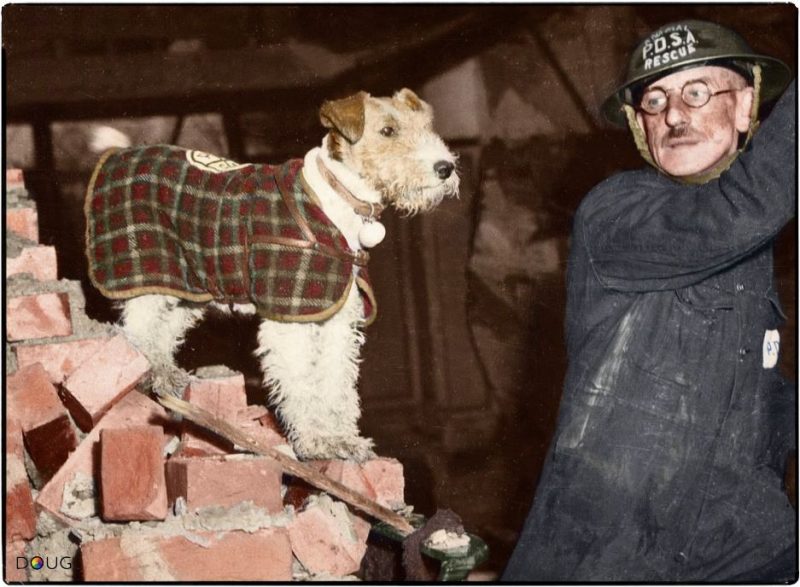
Beauty’, a wire-haired terrier belonged to PDSA Superintendent Bill Barnet who led one of the charity’s Animal Rescue Squads that operated throughout the heavy bombing raids on London in the early years of World War II. Beauty was always good company for Bill as he searched for trapped pets in the rubble but one night in 1940 the dog decided to dig in the debris too. Minutes later the team helped ‘Beauty’ to uncover a cat buried beneath a table.
During her wartime career, ‘Beauty’ saved 63 animals from being buried alive. In recognition of her work, ‘Beauty’ was awarded many accolades including the PDSA Pioneer Medal (normally only given to people), plus a silver mounted collar inscribed ‘For Services Rendered’ from the Deputy Mayor of Hendon. She also received ‘the freedom of Holland Park and all the trees therein!’ In January 1945 Beauty received the highest honour of all – the PDSA Dickin Medal. (Maria Dickin was the founder of the PDSA – ‘Peoples Dispensary for Sick Animals’)
(Colourised by Doug) http://
T/Sgt. Benedict “Benny” Borostowski, ball turret gunner of Capt. Oscar D. O’Neil’s B-17 Flying Fortress “Invasion 2nd” (serial 42-5070) of the 401st Bomb Sq, 91st BG.
The B-17 and crew were on a bombing run destined for the Focke-Wulf factory in Bremen on the 17th of April 1943 when it was hit by flak and crashed in the region of Nikolausdorf, near Oldenburg in Germany.
“Invasion 2nd” formed the lead plane of the first element of six aircraft making up the lowest squadron. Taking flak hits and attacks by German fighters over the target, the number two engine was completely shot away. The left wing caught on fire and spread to the fuselage. Captain Oscar D. O’Neill called for the crew to bail out but Waist Gunners T/Sgts. Lapp and King were prevented from leaving by a stuck escape hatch. The ball turret gunner, Technical Sergeant Benedict B. Borostowski, came up into the fuselage from the ball turret and went to the partly open waist door. He found Lapp and King unable to force the door and used his foot to push both of them through. All of the crew members were able to leave the aircraft and survived the jump. They all spent the remainder of the war as POWs.
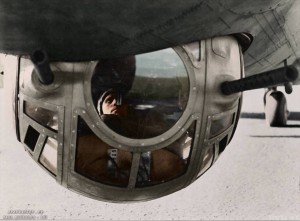
The ‘Sperry’ ball turret, meant for ventral defense needs on aircraft, was used on both the B-17 Flying Fortress and the B-24 Liberator as well as the United States Navy’s Liberator, the PB4Y-1. The Sperry ball turret was very small in order to reduce drag, and was typically operated by the shortest man of the crew. To enter the turret, the turret was moved until the guns were pointed straight down. The gunner placed his feet in the heel rests and then crouched down into a fetal position. He would then put on a safety strap, close and lock the turret door. The gunner sat in the turret with his back and head against the rear wall, his hips at the bottom, and his legs held in mid-air by two footrests on the front wall. This left him positioned with his eyes roughly level with the pair of light-barrel Browning AN/M2 .50 caliber machine guns which extended through the entire turret, and located to either side of the gunner. The cocking handles were located too close to the gunner to be operated easily, so a cable was attached to the handle through pulleys to a handle near the front of the turret. Small ammo boxes rested on the top of the turret and the remaining ammo belts were stowed in the already cramped turret by means of an elaborate feed chute system. A reflector sight was hung from the top of the turret, positioned at head height, there was no room inside for a parachute, which was left in the cabin above the turret. A few gunners wore a chest parachute.
The turret was directed by two hand control grips with firing buttons similar to a one-button joy stick. Hydraulics normally powered elevation and azimuth. Hand cranks were available for backup. The left foot was used to control the reflector sight range reticle. The right foot operated a push-to-talk intercom switch.
Colourised by Paul Reynolds. https://www.facebook.com/
A group from the Special Boat Section (SBS) pose for the camera on a Greek island. c.1942.
Dick Holmes, one of the few surviving SBS members, put it like this: “We were to be terrorists, our job was to terrorise the Germans, and we did.”
The Special Boat Section was founded in July 1940 by a Commando officer, Roger Courtney. He was unsuccessful in his initial attempts to convince the Admiralty, that his idea of a folding kayak brigade would be effective. He decided to infiltrate HMS Glengyle, an Infantry Landing Ship, anchored in the River Clyde. Courtney paddled to the ship, climbed aboard undetected, wrote his initials on the door to the captain’s cabin, and stole a deck gun cover. He presented the soaking cover to a group of high-ranking Royal Navy officers meeting at a nearby Inveraray hotel. He was promoted to captain, and given command of twelve men, the first Special Boat Section.
Attached to Layforce they moved to the Middle East, they later worked with the 1st Submarine Flotilla based at Alexandria and carried out beach reconnaissance of Rhodes, evacuated troops left behind on Crete and a number of small-scale raids and other operations. In December 1941 Courtney returned to the United Kingdom where he formed No2 SBS, and No1 SBS became attached to the Special Air Service (SAS). In June 1942 they took part in the Crete airfield raids. In September 1942 they carried out Operation Anglo, a raid on two airfields on the island of Rhodes, from which only two men returned. Destroying three aircraft, a fuel dump and numerous buildings, the surviving SBS men had to hide in the countryside for four days before they could reach the waiting submarine. After the Rhodes raid the SBS was absorbed into the SAS due to the casualties they had suffered.
In April 1943, 1st SAS was divided into two with 250 men from the SAS and the Small Scale Raiding Force, forming the Special Boat Squadron under the command of Major Jellicoe. They moved to Haifa and trained with the Greek Sacred Regiment for operations in the Aegean.
They later operated among the Dodecanese and Cyclades groups of islands in the Dodecanese Campaign and took part in the Battle of Leros and the Battle of Kos. They with Greek Sacred Band took part in the successful Raid on Symi in July 1944 in which the entire German garrison was either killed or captured. In August 1944 they joined with the Long Range Desert Group in operations in the Adriatic, on the Peloponnese, in Albania, and, finally, Istria. So effective were they that by 1944 200–300 SBS men held down six German divisions.
Throughout the war, the No2 SBS did not use the Special Boat Squadron name but instead retained the name Special Boat Section. They accompanied Major General Mark Clark ashore before the Operation Torch landings in November 1942. Later one group, Z SBS, which was based in Algiers from March 1943, carried out the beach reconnaissance for the Salerno landings and a raid on Crete, before moving to Ceylon to work with the Special Operations Executives, Force 136 and later with Special Operations Australia. The rest of No2 SBS became part of South-East Asia Command’s Small Operations Group, operating on the Chindwin and Irrawaddy rivers, and in the Arakan, during the Burma campaign.
They became known as the Special Boat Service in the 1980’s.
(Colourisation and text by Paul Reynolds) https://www.facebook.com/
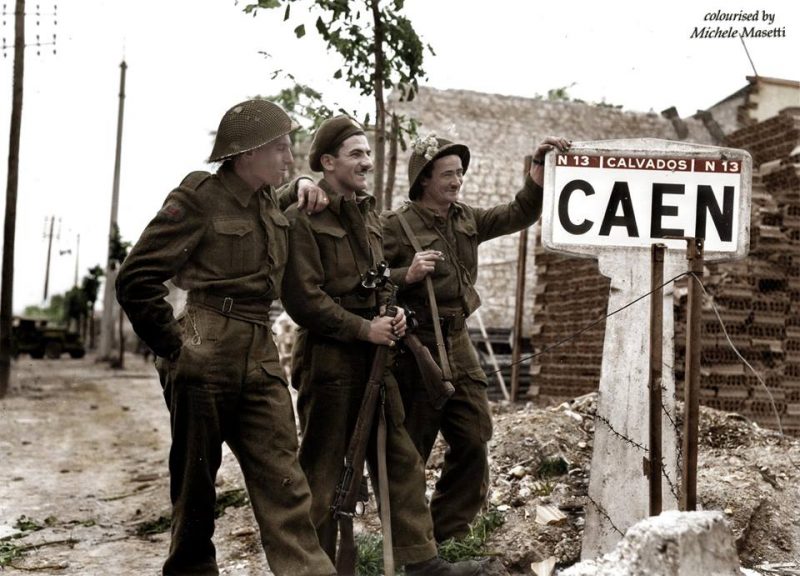
Canadians, Bernard Hoo, John McConville and JR Kostick all of the Canadian Royal Engineers, 9th Brigade, 3rd Canadian Division, stand at the west entrance to the city of Caen on the 9th of July 1944.
All three met again at the same spot, almost 44 years later on the 6th of June 1988. (Colorised by Michele Masetti from Italy)
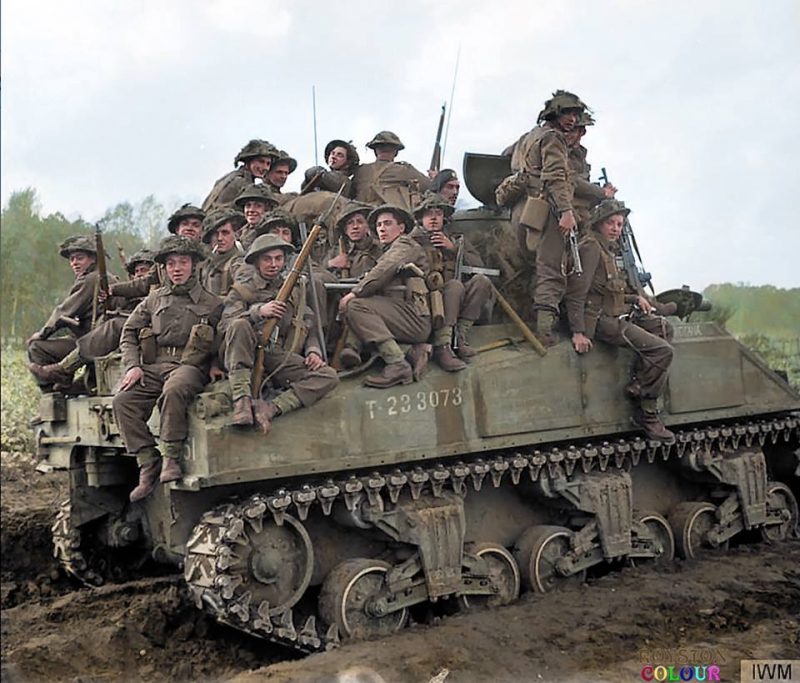
OPERATION COLIN, BATTLE OF MAAS.
Infantry of the 153rd Brigade, 51st Highland Division are carried into battle aboard a Sherman tank (T-233073) near Udenhout in the Netherlands. 29th of October 1944. **(additional info – this is the M4.Sherman Mk.I “India” of B Sqn. 1Tp – 1st Northamptonshire Yeomanry, 33rd Armoured Brigade)**
On the 22nd of October 1944 the 51st Highland Division was part of ‘Operation Colin’. The plan for the Divisional attack was that 153 Brigade objective was Schijndel, 152nd Brigade to the left would clear the wooded area east of the River Dommel and 154th Brigade, mounted in Kangaroos, would be in reserve. The attack began on the night of 22 october. Schijndel was taken relatively easily and the Division pressed on. In the night of October 25th – October 26th two battalions (2nd Seaforths and 5th Seaforths) of the 152nd Brigade broke through the German lines at Esch. At the end of the day the brigade reached Vught. Vught was already liberated by the 154th Brigade.
In the evening of the 27th of October the Division got the orders to take the village of Loon op Zand. Two battalions of the 153rd Brigade entered the village from the south and one battalion from the west. Around 09.00 on the 28th October the three battalions almost had the entire village under their control. They didn’t manage to drive all the Germans out and the 152nd Brigade was also thrown into the battle. They advanced from the east and had to take the northern part of the village. Then the Germans would be surrounded. At first the 152nd Brigade made good progress. But around 16.00 the 2nd Battalion Seaforth Highlanders got lost in thick woods that were full of landmines. The Germans then realised they were about to be surrounded and withdrew to Kaatsheuvel.
On October the 30th the 152nd Brigade liberated Waalwijk. The Germans withdrew behind the Afwateringskanaal (canal) and blew up the bridges over the canal.
(Colourised by Royston Leonard UK) https://www.facebook.com/
::__IHACKLOG_REMOTE_IMAGE_AUTODOWN_BLOCK__::27
7
A wounded German Prisoner of the 15th Panzergrenadier Division offers a light to one of his captors; a wounded British Army soldier of the 6th Durham Light Infantry, 50th (Northumbrian) Infantry Division, XXX Corps. The two soldiers wait to be taken to a field hospital following hostilities at the Mareth Line during ‘Operation Pugilist’, the British campaign to destroy the Axis Italian and German forces opposing the Eighth Army in southern Tunisia and capture the city of Sfax.
Tebaga Gap, near Medenine, Medenine Governorate, Tunisia. 23rd of March 1943. (Colourised by Doug)
http://
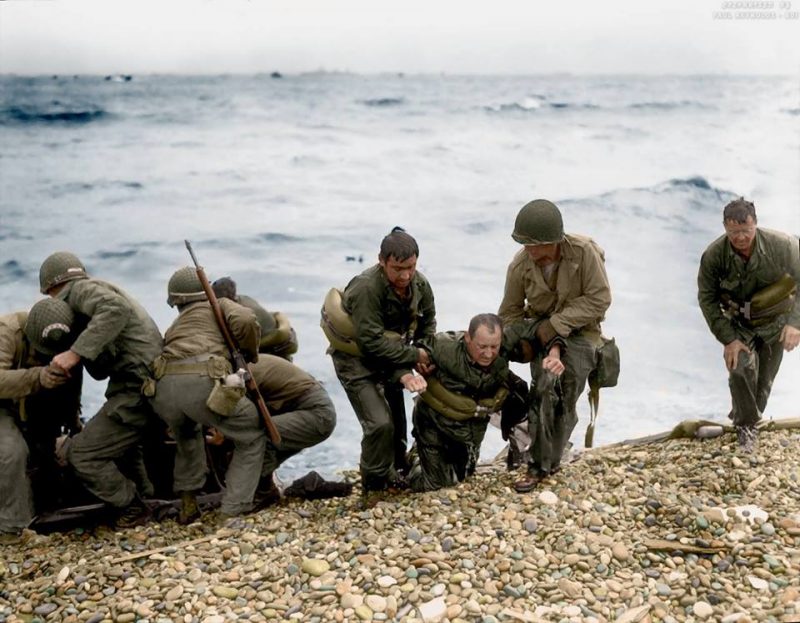
Medics from the 5th and 6th Special Engineer Brigade help wounded soldiers on Omaha beach, Fox Green and Easy Red sectors. Survivors of sunken landing craft are recovered by other troops, who reached the beach by using a life raft. June 6th, 1944, D-Day.
(Photographer: Pvt. Louis Weintraub, of the 165th Signal Combat Camera Company – US Army Signal Corps – SC190366)
(Colourisation and Research by Paul Reynolds.) https://www.facebook.com/
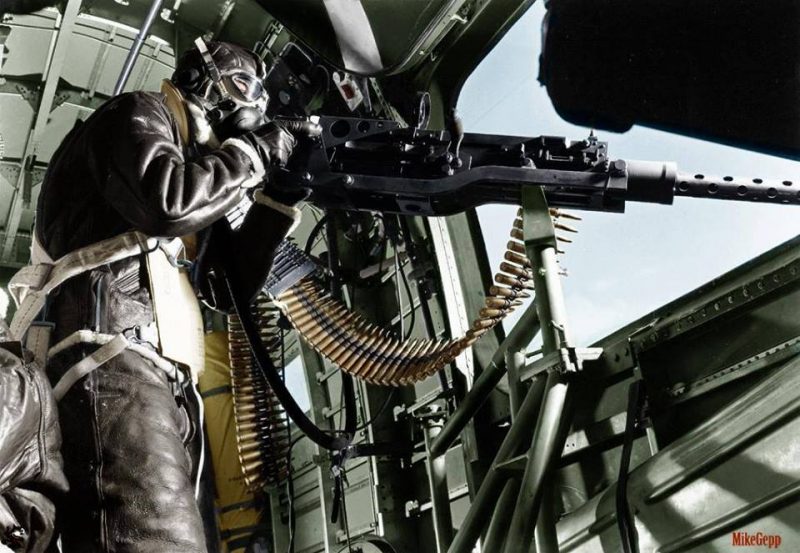
The Consolidated B-24 ‘Liberator’ waist gunner c.1944
Waist gunners were charged with the defence of the Liberator’s vulnerable sides through use of single 12.7mm machine guns. As such, these positions aboard Liberators suffered the most casualties by incoming fighters ready to strafe the large profile sides of the bomber. These two positions, left and right, were later staggered to compensate for each gunners firing arc. Unlike other turreted positions in the B-24, spent shell casings at these waist positions were not jettisoned from the aircraft automatically, forcing crew-members to clear their areas themselves. Since firing from these side-perspective positions required a great deal of hand-to-eye coordination via tracer rounds while taking into account target speed and the Liberator’s airspeed itself, waist gunners relied on simple targeting sights in the early years. Only later did they receive assistance in the form of compensating sights to help improve accuracy.
(Colorised by Mike Gepp from Australia)
This Panzer VI Tiger II ‘Königstiger’ (Turret Nº 2-11) from the 2.Kompanie, schwere Panzer Abteilung 506 was captured by American troops and restored to a running condition by Company ‘B’ of the 129th Ordnance Battalion, 7th Armored Division in Gereonsweiler, Germany on the 15th of December 1944.
The ‘Tiger’ took a hit to the base of the turret that jammed it at the 3 o’clock position. A heavy wrecking truck was used to ‘twist’ the turret to the forward position and the US soldiers, seen here, are probably engaged in a battlefield clearance operation. (see the attached video)
(Colorized by Tom Thounaojam from India) https://www.facebook.com/
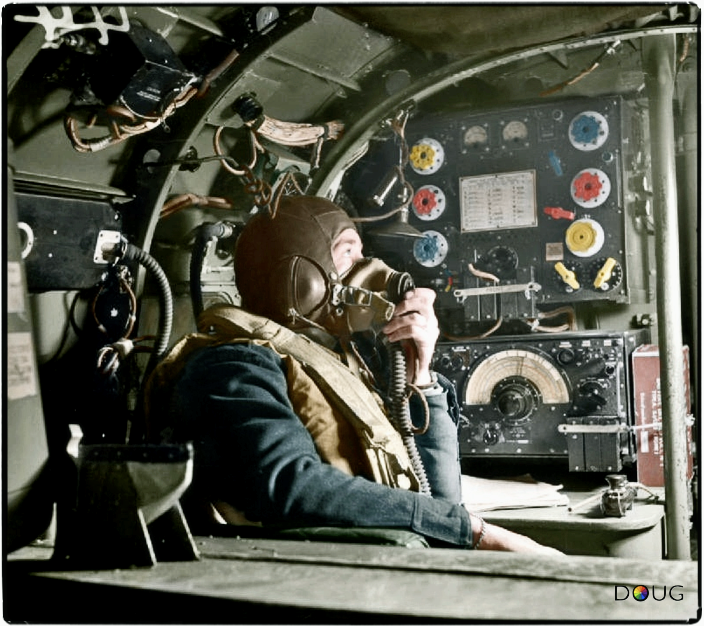
Flying Officer R. W. Stewart, a wireless operator on board an Avro Lancaster B Mark I of No. 57 Squadron RAF based at Scampton, Lincolnshire, speaking to the pilot from his position in front of the Marconi TR 1154/55 transmitter/receiver set. c.1942-43
(© IWM CH 8790) Royal Air Force official photographer Pilot Officer N.S. Clark (Colourised by Doug)
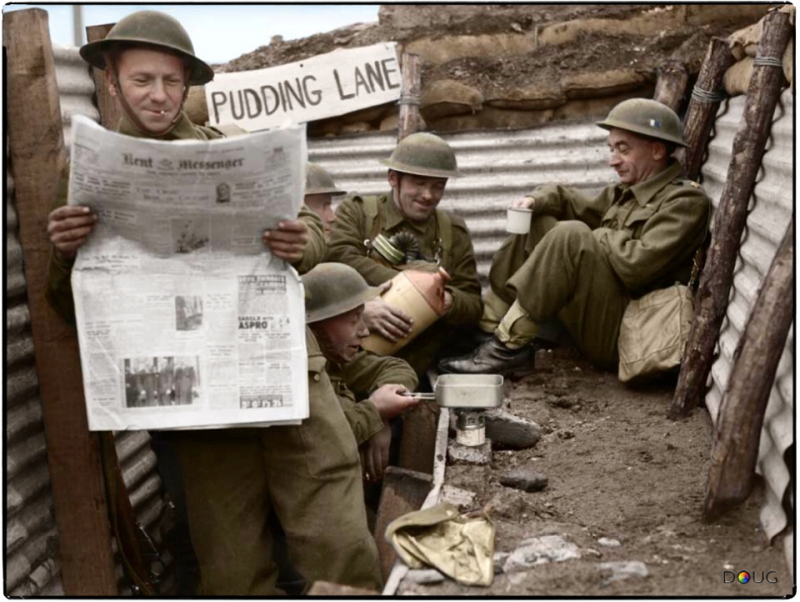 Men of the 1st Queen’s Own Royal West Kent Regiment, 4th Infantry Division enjoy a tot of rum in a section of trench named ‘Pudding Lane’, near Roubaix, a commune in the Nord department in northern France. 3rd of April 1940.
The 1st Battalion was part of the 10th Infantry Brigade, 4th Infantry Division of the British Expeditionary Force in France in 1940, returning to Britain via Dunkirk. After returning to the United Kingdom, the 1st Queen’s Own was transferred to the 12th Infantry Brigade, still part of the 4th Division. It remained in Britain until 1943, leaving to take part in the Tunisian Campaign, the Italian Campaign and the Greek Civil War that broke out after the German withdrawal in 1944.
War Office official photographer – Lt. L A Puttnam (© IWM F 3551) (Colourised by Doug)

Fallschirmjäger Obergefreiter loading a 75mm round into the breach of a PaK 40 anti-tank gun mounted on a Marder II (Sd.Kfz. 131) Panzerjäger, somewhere in Russia, March 1943.
The Marder II was based on the Panzer II chassis. It’s weaknesses were mainly related to survivability. The combination of a high silhouette and open-top fighting compartment made them vulnerable to indirect artillery fire, shrapnel, and grenades. The armour was also quite thin, making them vulnerable to enemy tanks or infantry.
The Marders were not assault vehicles or tank substitutes; the open top meant that operations in urban areas or other close-combat situations were very risky. They were best employed in defensive or overwatch roles. Despite their weaknesses they were much more effective than the towed anti-tank guns they replaced.
(Source – Bundesarchiv Bild 101I-580-1113-20) (Colourised by Doug – Researched by John Winner)
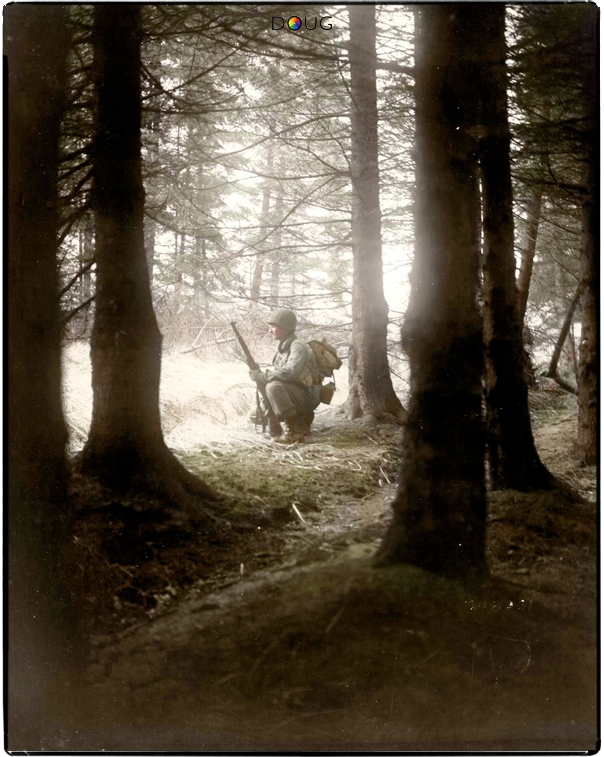 Staff Sergeant George W. Talbert of the 3rd Battalion, 18th Infantry Regiment, 1st Infantry Division on the lookout in a forest near Sourbrodt in Belgium. 19th December 1944.
George W. Talbert, Dubuque County, Iowa – KIA January 16, 1945 (aged 24) (Colourised by Doug)