During the 19th century, the sun did not set on the globe-spanning British Empire. It was not an inherently evil institution, and many good was brought from the spread of modern technology and new ideas across the world. Plenty of men, however, used the Empire to suit their own interests. This was very much the case when large amounts of diamonds were discovered in South Africa, prompting British Imperialists to scheme a way into ruling the region.
It was a largely diplomatic scheme to establish a British-run territory, but the imperialists knew that they would likely have gone on a military campaign to deal with the tribal Zulu forces and drafted an ultimatum agreement that the Zulu would never accept. When the ultimatum expired, it forced a “just” war for the British who invaded with a moderately sized army under Lord Chelmsford.
Chelmsford was initially concerned that the Zulu would avoid combat, so he split his forces into 3-5 groups to hopefully corral the Zulu and force a decisive engagement. Chelmsford was known to be extremely dismissive of the primitive warrior tribes, prescribing to the common idea that small numbers of British could easily dispatch tribal units of much larger size.
He did have a point, the British were highly trained, professional soldiers with cavalry detachments and this particular group was largely armed with the newest in firearms technology. They wielded the new Mk2 Martini–Henry Rifle, accurate to 400 yards and easily capable of over ten shots a minute.
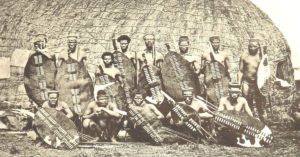
The Zulu army was no mere rabble however, the tribe was known for its organized tactics and ruthless warriors. The great Zulu leader Shaka had died fifty years earlier, but his military revolutions were still largely in place. The Zulu were organized in regiments by age, creating a strong bond and easy organizational system.

The Warriors kept the traditional throwing spears but also added the hand to hand sword-spear known as the Iklwa, supposedly named for the sound it made when removed from a body. Furthermore, the warriors went to battle barefoot, with special training on toughening their feet to become as swift as possible on the march and in battle. the most famous tradition of Shaka was the bull horn formation having a central, veteran “chest” pin down an army while younger and faster “horn” formations outflanked the enemy.

As Chelmsford’s division arrived at the rocky hill of Isandlwana, he set up camp but neglected to fortify it. Chelmsford personally was known as a strong advocate of habitually fortifying camps and drawing supply wagons together in a defensive formation. His disregard for tribal units got the better of him, however, and when asked why he wasn’t fortifying he replied that “it is not worthwhile.”
Scouts soon reported some Zulu warriors in the distance and Chelmsford, thinking this was the vanguard of the main army, took roughly half of his army out in pursuit, leaving an administrator, Henry Pulleine, in charge of the camp. The Zulu had not been part of the main army and purposefully led Chelmsford away to the east.

To the northeast, a large force of around 20,000 Zulus gathered in a hidden valley less than ten miles away from the main camp defended by around 1,500 men, soon joined by a cavalry detachment under Col. Durnford who also brought some rocket artillery. As Durnford arrived he spotted more Zulu warriors in the area where Chelmsford had marched away. Durnford rode to prevent an attack on Chelmsford’s rear but as he was riding, British scouts stumbled upon the hidden main Zulu army.
The Zulu commanders were unable to restrain their troops and the Zulu charged as a mass towards the camp, but had the discipline to form into their traditional bull horn formation, with the chest heading straight for the camp. The right horn looping wide around to the north of the Isandlwana hill and the left horn heading towards Durnford’s isolated group. The battle had begun and Lord Chelmsford was entirely out of the picture.
Staring down the thousands of Zulu warriors charging at his camp, Pulleine sent his men out to form a ½ mile long firing line. This was likely the best decision as it put the full firepower of the British to the front and afforded the opportunity for a fighting retreat back to the camp. The Mk2 Martini–Henry had tremendous stopping power and the high rate of fire halted the advance of the Zulu chest.Durnford, however, was heavily outnumbered dealing with parts of the chest and left horn charge. Durnford had his men dismount when they reached a defensible rocky outcropping and fire volleys and the charging Zulu. When they got too close Durnford’s group mounted and galloped to the next defensible area until they finally reached a defensive position just to the right edge of the British camp’s defensive line. The first losses were the rocket artillery who attempted to set up and fire at the Zulu, but being on foot, were quickly overrun.
Durnford, however, was heavily outnumbered dealing with parts of the chest and left horn charge. Durnford had his men dismount when they reached a defensible rocky outcropping and fire volleys and the charging Zulu. When they got too close Durnford’s group mounted and galloped to the next defensible area until they finally reached a defensive position just to the right edge of the British camp’s defensive line. The first losses were the rocket artillery who attempted to set up and fire at the Zulu, but being on foot, were quickly overrun.
The Zulu advance nearly halted in the face of deadly British volleys, though many warriors showed their bravery by sneaking ever closer between every volley. Eventually, some warriors wedged themselves between the British right flank and Durnford’s position forcing Durnford to fall back to the main camp. This led to a collapse of the British flank.
The British center now attempted to orderly fall back towards their camp, but the Zulu chest eagerly took advantage of this movement and closed the gap with great speed, and impressive timing. The orderly retreat turned to a confusing slaughter as the Zulu, finally in melee range, showed the British their expert skill at hand to hand combat. The British had a scattered array of swords and bayonets, but nothing to effectively fight against the Zulu. Small groups of British formed to make a last stand as the Zulu flowed around them and ravaged the camp.
There was evidence of groups as large as 150 men making a last stand, and even an account of a lone British soldier hiding in a cave who fought for hours before being hauled out and killed. Commanders Durnford and Pulleine were both killed as a few hundred British attempted to flee. Chelmsford returned to the camp later that night to appalling scenes of carnage, particularly gruesome due to the Zulu tradition of slicing through the gut of wounded or fallen foes to release the spirit of the warrior.
To keep from the day being a complete disaster 150, British were able to defend against the 4,000 Zulu from taking Rorke’s Drift, an important border check between the Zulu kingdom and British colonial lands.

The battle of Isandlwana was surely a failure on the part of Chelmsford, his decision to take half of his force and leave his camp undefended doomed the men, but the battle is more of a showcase of Zulu talent than British failure. The firing line organized by Pulleine was the right move, as was Durnford’s fighting retreat and defensive position to guard the flank.
Contrary to common thought saying that the British lines could not access their ammo as it was poorly distributed and the boxes themselves were time-consuming to open, there were no issues with ammo. The boxes were closed with one screw that could be easily bent and broken by smashing it on the ground or with a rifle but, such bent screws were found all along the area of the British lines, showing that ammo was distributed and desperately, but quickly, opened.

Had the Zulu attacked in a single mass the British could have concentrated their fire and prepared better defenses at the point of attack, but the three-pronged bull horn attack was executed to perfection.
On a regimental scale the Zulu were disciplined enough to know when to take cover and wait for the horns to attack, and having the sense to attack with tenacity to turn the British refortification attempt into a rout was the key to victory, while the bravery of the Zulu warriors allowed them to fearlessly engage and close with soldiers with powerful firearms.
Ultimately, the skill of the Zulu army won the battle as much as the British failures lost it.